Friday, December 24, 2010

Lost it?

I think I have gone and lost it. Lost my kitchen mojo that is. Usually this time of year I am constantly in the kitchen, baking cookies and stews, braising meat and making stock. This year? All I seem to be doing in the kitchen is screwing things up. Burned caramel, melted cookies, disastrous deep frying incident...it's really been bringing me down. Things have been so hectic around here, it seems that when I finally get a chance to get my butt behind the stove, I am more rushed than usual and when that happens I have a tendency to let things get out of control (see the disintegrating falafel incident).


One thing that DIDN'T get screwed up royally was our Middle Eastern/Mediterranean Christmas feast. Well, the majority turned out wonderfully anyway. I need a new falafel recipe, as the one I used completely burst into a million little pieces once dropped into the deep fryer. Luckily, we still had plenty of hummus, pitas, and beef and chicken shawarma to fill our bellies that night.


I don't know how authentic these recipes are, but the spices in both the chicken and the beef meatballs, tasted just like the shawarma you would get from your local middle eastern take-out place. Shawarma is typically roasted on a spit over hot fire and sliced off in thin layers, similar to a kebab, but since I have neither a large spit, nor a large fire, I opted for my broiler and a charcoal grill. Topped with some very pungent tahini sauce and stuffed into a soft, thick pita, they hit the spot.

Chicken Shawarma
adapted from about.com
makes about 4-6 sandwiches

1 1/2 pounds boneless chicken breast tenders
1 cup plain Greek yogurt
1/4 cup white distilled vinegar
3 garlic cloves, minced finely
1 teaspoon fresh ground black pepper
1/2 teaspoon salt
1/4 teaspoon ground cardamom
1 teaspoon ground allspice
juice of 1 lemon

Combine all ingredients minus chicken in a large ziploc bag and mix until combined. Add chicken, coat evenly, and let marinate in the refrigerator overnight, or at least 8 hours.

Prepare grill. I grilled these on a charcoal grill over direct heat, moving the chicken to indirect heat when they were nice and seared. The chicken I used was pretty thin, so it took about 10-15 minutes total cooking time. Just be sure to bring the internal temperature up to 165. You can also cook these on a grill pan indoors if you have a good vent hood, as the marinade is going to create some serious smoke.

Serve warm or at room temperature in pitas with hummus or tahini sauce. If you are one of those crazy people who actually likes cucumbers, I hear some slices are particularly good on this sandwich.

Beef Shawarma Meatballs
adapted from Evil Shenanigans
makes about 20-24 meatballs

1 pound ground beef (I used 80/20, but you can go a little leaner if you want)
3 garlic cloves, minced finely
1/2 teaspoon fresh ground pepper
1/2 teaspoon salt
1/2 teaspoon ground allspice
1/2 teaspoon ground cardamom
1/4 teaspoon ground cinnamon
1/4 teaspoon ground coriander
1 tablespoon lemon juice
1/2 onion, diced finely
2 tablespoons plain Greek yogurt

Line a baking sheet with tin foil and spray lightly with non-stick cooking spray.

In a large bowl, mix all ingredients until well combined. Gather about two tablespoons, roll into a ball, place on prepared baking sheet. Repeat with remaining beef mixture. You should get about 20-24 meatballs. Let rest at room temperature for 30 minutes.

Preheat your broiler, bake for 15-20 minutes, until the internal temperature reaches 155. Cover with foil and let rest for 10 minutes before serving.

Tahini Sauce

1 cup tahini
1/4 cup Greek yogurt
3 cloves garlic, minced very finely
1/4 cup lemon juice
1 teaspoon ground cumin

Mix all ingredients together in a medium bowl. Let stand at room temperature until serving.

Tuesday, December 7, 2010

Pumpkin Mac


Thanksgiving is long gone, the Christmas decorations are up, the ground is covered in snow....and yet I am still finding random cans of pumpkin around my apartment. I am not kidding, they are everywhere. I think that as a result from the big pumpkin-shortage scare of 2009, I over compensated with my pumpkin purchasing this fall. Every time I went to the grocery store in late October and early November, I picked up a can, you know, just in case they ran out before Thanksgiving. I wonder if I am beginning to exhibit hoarding tendencies.


Luckily, after all the pumpkin pies and tarts were made, I found an even better way to use up my seemingly endless supply of extra pumpkin. Pumpkin macaroni and cheese. I have been seeing versions of this creation all over the blog-o-sphere lately, and I am so glad I tried it. It wasn't overwhelmingly pumpkin-y, but very rich and creamy with a hint of squash flavor at the end. I added some Gorgonzola and ground mustard to the mix, just to give a little extra bite to cut through the rich cheesy pumpkin sauce.


Pumpkin Macaroni and Cheese
serves 8-10

1 pound dried pasta (I prefer cavatappi or penne rigate, it holds the sauce really well)
1 quart whole milk
1 stick butter, divided
1/2 cup flour
1 15 ounce can pure pumpkin puree (DO NOT use pumpkin pie filling, not the same thing!)
8 ounces Gruyere cheese, grated
8 ounces cheddar cheese, grated
4 ounces crumbled Gorgonzola cheese
1 teaspoon ground mustard powder
1/2 teaspoon ground nutmeg
1/2 teaspoon freshly ground black pepper
1 tablespoon salt
1 1/2 cups panko bread crumbs
1/2 cup pecorino romano cheese, grated

Bring a large pot of salted water to a boil, and cooked the pasta until just al dente. It should still have some bite to it as it will continue to cook while baking. Drain, set aside.

Preheat oven to 375 degrees F. Meanwhile, heat the milk in a small saucepan over low heat, being careful not to let it boil or burn.

Melt 6 tablespoons of the butter in a large, heavy bottomed pot over medium-low heat. Add the flour and whisk constantly until combined and just starting to turn a light brown color, about 2-3 minutes. Slowly add in the milk, whisking until smooth and thick, about 3-5 minutes. Remove from heat and stir in the Gruyere, cheddar, and Gorgonzola cheeses, pumpkin puree, salt, pepper, nutmeg, and ground mustard.

Add the pasta and stir until pasta is evenly coated. Pour into a 10 x 14 baking dish, or alternatively you can use two slightly smaller ones. (I do this, and freeze one of the pans after baking, that way I am only tempted to eat half a pound of pasta in one sitting, rather than the entire pound.)

Melt the remaining two tablespoons of butter in the microwave, then mix with the panko and pecorino romano. Sprinkle the bread crumb mixture all over the top of the pasta and bake for 30-40 minutes, until top is golden brown and bubbly.

If anyone has any other more savory ways to use up excess pumpkin, please let me know in the comments, I think I still have a few cans lying around...

Wednesday, November 24, 2010

Home Sweet Home...and Pie


Home sweet home. I finally picked a day to drive to Minnesota that was not smack dab in the middle of a snowstorm. The past few years for Christmas and Thanksgiving, whenever i decide to make the drive, old man winter decides to throw a ridiculous snowstorm at me. I am not sure what he has against me going home, but I showed him this year. Though, it was intensely sunny and when I opened up my sunglasses case, one of the screws was missing, so I spent the entire 7 hour drive squinting into the setting sun....I can't win.


It is wonderful to be home, I am sitting in my pj's, dad cooked me truffled eggs for breakfast, we are bracing for the storm of the century, and the smells of thanksgiving dinner are beginning to waft through the house. Onions caramelizing, sage frying, homemade turkey broth bubbling, it all has me salivating for tomorrow's feast. It is just a lovely way to start the day.


Are you ready for thanksgiving? Is all your shopping done, and food prepped? The nice thing about coming home is that all I have to do is drink wine and chop/stir/plate where needed. I already had my effort-heavy thanksgiving meal last weekend, so this time around I just get to kick back and enjoy it. I was in charge of dessert last weekend, and, though most of us were too full by the time we got there, it was a tasty ending to a fun and friend-filled day.


I made this pumpkin pie from the Thanksgiving Bon Apetit Magazine, substituting my very favorite pate brisee crust. It is a beautiful twist on the plain whipped-cream topped pumpkin pie we are used to seeing around this time of year. Toasted nuts with crystallized ginger creates a pretty border and adds that crunchy extra-something to the creamy pie and buttery crust.


Pumpkin Pie with Glaze Ginger-Nut Topping
adapted from Bon Apetit Magazine

1/2 batch pate brisee (or pie crust of your choice), rolled out to 1/4 inch thick disc and chilled

Topping:

1 tablespoon butter
1/4 cup sliced almonds
1/4 cup chopped pecans
2 tablespoons pepitas
2 tablespoons brown sugar
large pinch of salt
2 tablespoons minced crystallized ginger

Filling:

1 - 15 ounce can pure pumpkin puree
1/2 cup packed brown sugar
1/2 cup sugar
1 tablespoon molasses
1 tablespoon all purpose flour
1 1/2 teaspoon ground cinnamon
3/4 teaspoon ground ginger
1/4 teaspoon ground cloves
1/4 teaspoon salt
2 large eggs + 1 large egg yolk
1 1/4 cups heavy cream

Transfer crust to a 9-inch pie pan, pressing the dough into the corners. Cut off excess dough, and crimp edges with thumbs. Freeze for 1 hour before baking.


In a large non-stick skillet, heat the butter over medium high heat. Add almonds, pecans, and pepitas and saute until nuts begin to brown slightly, just about 2 minutes. Sprinkle brown sugar and salt over and stir and cook another 2 minutes, until sugar has melted and nuts have been coated. remove from heat and stir in ginger. Set aside.


Preheat oven to 375 degrees F, with rack in center position. Line the pie crust with tin foil, and fill with pie weights, rice, or dried beans. Bake crust for 25 minutes, remove weights and tin foil, and bake for another 8 minutes. Remove crust from oven, but leave the oven on.

While the crust is blind baking, in a large bowl combine the pumpkin, both sugars, molasses, flour, cinnamon, ginger, cloves, and salt. Whisk together until combined. Add the eggs, yolk, and cream. Whisk until smooth.

Pour filling into warm crust and bake for 20 minutes. remove pie from oven, and wrap strips of foil gently around the exposed crust to prevent it from becoming too dark and/or burning. Return to oven and bake for another 40-55 minutes, depending on how deep your pie pan is. Mine is very deep so it took close to 55 minutes for middle to set. It may still jiggle a bit in the center, but if you touch the center with your finger, and it is tacky, but not liquid-y, the pie should be good to go.

Transfer to pie rack and sprinkle the nut topping around the perimeter of the filling, leaving a circle in the center exposed.

Monday, November 22, 2010

Cranberry Wild Rice French Toast


Pie dough is chilling in the fridge, cranberries are popping on the stove, sugared nuts are toasting in the oven, coffee is brewing....uh, in the coffee maker. Its only 9:30 and I am well into a mad dash to get everything made for Thanksgiving #2 this afternoon. I am not hosting this year, so the turkey was passed along to someone else, but I have plenty of other items to share with the party.

I am so looking forward to this feast (and of course the one next week as well) especially after spending last weekend not eating. At all. My boyfriend and I came down with the stomach flu on Saturday, and it pretty much put me out of commission the entire weekend and the beginning of the week. What started out as a nice, relaxing Saturday morning with a pot full of coffee and some delicious french toast, turned into a nightmarish 48 hours. I was at least lucky enough to get one last meal in before the flu set in, the boyfriend wasn't so lucky.


A few months back I was watching the Food Network, and they were profiling a diner somewhere in Minnesota whose specialty was their french toast. This was no normal french toast however. They made it with bread, cooked in house. Sound delicious? I'm not done yet. The bread has cranberries and wild rice baked right in. YUM. I knew I had to make this soon, and just happened to pick up a bag of Minnesota grown wild rice last time I was up visiting my family. Game on.

It is a lot of work, obviously you want to make the bread ahead of time, and use any leftovers to make some sublime french toast. Unless you want to do it all in one day and eat breakfast for dinner, which is totally allowed in my book. The bread on its own is delicious, smeared with a bit of butter, or used as sandwich bread.


Cranberry Wild Rice Bread
makes one large loaf, or one small loaf and 6 rolls
recipe adapted from A Bread A Day

2 1/2 cups bread flour
1/2 cup whole wheat flour
2 1/4 teaspoons active dry or instant yeast
2 teaspoons salt
1 1/4 cups water, room temperature
2 tablespoons molasses, room temperature
1 tablespoons olive oil
3/4 cup wild rice, cooked and cooled
1/2 dried cranberries, chopped
2 tablespoons unsalted butter, melted and cooled

In the bowl of a stand mixer, whisk together the flours, yeast, and salt. Switch to the dough hook attachment, and add the water, molasses, and olive oil. Mix on low until a shaggy dough forms, then increase the speed to medium and knead until the dough is smooth and elastic, about 7-8 minutes.

Turn the speed back to low, and add the cranberries and wild rice, and knead until evenly distributed throughout the dough. Transfer the dough to a lightly oiled glass or metal bowl, and tossed the dough around to coat the entire ball with oil. Cover with plastic wrap, and place in a warm place to rise for about 1 1/2 hours, until doubled in size.

Line a baking sheet with parchment paper (if you are making rolls) or spray a loaf pan lightly with oil (if you are making a loaf). Lightly deflate the dough and either divide it into 12 pieces, shape into round rolls and place on baking sheet, or place the entire dough ball into the loaf pan.

Cover with a oiled piece of plastic wrap and let rise again for about an hour. Meanwhile preheat your oven to 400F if you are baking rolls, 375 if you are baking a loaf. Brush the tops of the rolls or loaf with melted butter and bake until golden brown. The rolls will take about 20 minutes, the loaf will take about 45-50 minutes.

Let loaf cool in pan for about 30 minutes then remove and let cool completely on wire rack. The rolls you can move directly to the wire rack to cool.

French Toast

1 cup half and half
3 large eggs
2 tablespoons honey, warmed in microwave for about 20 seconds
1/4 teaspoon salt
8 - 1/2 inch slices cranberry wild rice bread
4 tablespoons butter

Mix together the half and half, eggs, honey, and salt in a medium mixing bowl. Pour mixture into baking dish. Preheat oven to 375 degrees F. Line a baking sheet with a wire rack.

Dip each piece of bread into the egg mixture and let soak for 30 seconds. Flip, and soak for another 30 seconds. Transfer each piece to the wire rack and let wit for 2 minutes before cooking.

Melt one tablespoon of butter in a skillet of medium low heat. Place two slices of bread in the pan at a time, and cook 2-3 minutes on each side. Remove from pan and place on wire rack. Repeat with the rest of the bread, adding more butter to the pan as needed. Bake on wire rack for 5 minutes.

Top with maple syrup or whipped cream, serve hot.

Monday, November 15, 2010

A Winner!

Sorry for the delay on this, its hard to work on a food blog when you are in the middle of dealing with stomach flu...But here it is!

The winner of the $45.00 gift certificate to CSN store online is.....


Mollie : "CLEARLY I would make that Shepherd's Pie, in honor of your fabulous blog!"

Congrats Mollie! Please send me your email address (thesepeasarehollow @ gmail dot com) so that CSN can contact you soon with your certificate code, let us know if you make anything delicious with what you decide to purchase! Thanks to everyone who entered, and all those who are followers!

Thursday, November 11, 2010

Truffled Potato & Portobello Tart


**Reminder, Giveaway ends this Friday, November 12th (that's tomorrow!) Go here to enter!**

It has recently occurred to me that I am obsessed with tarts. Big tarts, little tarts, sweet tarts, savory tarts. Line some goodies with pastry or a crust of some sort, and I am in. Such an easy sell. Mashed potatoes? Sure I like them, but mashed potatoes baked inside a pastry dough? Give it to me right now.


This tart may contain everything I want out of comfort food. Creamy, cheesy mashed potatoes, crispy, buttery filo dough, earthy, hearty mushrooms, fresh chives, and a drizzle of truffle oil. Oh yes, that's right, I played the truffle oil card. My older, wiser sister is a firm believer that, like bacon, truffles make pretty much everything better. If that is her conviction, I think I would like to join the faith. Think there is a truffle worshiping church somewhere in Italy? There should be.

I don't know what took me so long, but I finally bit the bullet and bought a bottle of black truffle oil. I need to restrain myself so I don't put it on everything I eat for the next two months. I cannot wait to try making my own slow fried eggs with a little of the oil drizzled over the top for breakfast this weekend. Or maybe for dinner tonight, I don't know if I can wait that long.


I saw a version of this tart on Jamie Oliver's show on the cooking channel last week, and knew instantly that I had to make it. Unfortunately, it is no longer asparagus season and there is little I detest more than asparagus spears that are an inch in diameter. I am very discriminatory when it comes to asparagus, I only like the skinny ones. Maybe someday I will learn to love all asparagus spears as they are, but for now I am set in my ways. This is coming from the girl who only used to eat the 'tree tops' off the broccoli and leave the rest. I have come a long way since then.


I had to think of something that would go well with the cheesy mashed potato base, but wouldn't put me into carbohydrate or starch overload. Many of the vegetables that are in season right now would probably have that effect. I instead decided to use thinly sliced portobello mushroom caps in place of the asparagus, and add a little Gruyere, chives, and of course truffle oil to the mix. It was wonderful. The smell was heavenly and I have been thoroughly enjoying eating all the leftovers this week.

The best part is, it was really easy to assemble. Filo, or Phyllo dough can be intimidating because it is so fragile and thin, but this tart is pretty rustic, it looks better that way. You don't have to worry about tearing the sheets of dough, just slather on some more melted butter and patch it up with the next layer. You could substitute puff pastry dough for a thicker and less fussy crust, but I like how light the crust was with just five or so layers of filo.


Or you can forgo the crust all together and just bake the filling, for a gluten free version. Almost just as good. Almost.


Truffled Potato & Portobello Tart
adapted from Jamie Oliver
serves 4-6

1 1/4 lb. (a little more or a little less if just fine) of russet potatoes, peeled and cubed
3-4 medium portobello mushroom caps, thinly sliced
5-6 sheets of filo dough
1/2 stick of butter, melted
3/4 cup white cheddar cheese, grated
3/4 cup Gruyere cheese, grated
3 large eggs
1 cup heavy cream
salt & pepper to taste
2 tablespoons minced chives
truffle oil for garnish

Place cut potatoes in a pot filled with cold water and boil until fork tender, about 15 minutes. Drain.

Preheat your oven to 375 degrees F. Take whatever dish you are planning on using, I actually used a 8 X 8 in cake pan that I lined with parchment paper (but you can using a baking dish, or a tart pan as well) and brush with melted butter to coat.

Take one sheet of your filo dough (keep the rest covered with a slightly damp paper towel so it doesn't dry out) and gently line your pan. Brush melted butter all over the filo, and repeat with 5-6 sheets of dough. You can leave the edges of the filo draped over the sides of the dish for now. Cover with a damp towel or paper towel and set aside.

In a small bowl beat the eggs together with the cream with a fork. In a large bowl, break up the potatoes with a masher, then add the cheeses and mash until combined. Add the cream and egg mixture and mash and mix until smooth. Season generously with salt and pepper.

Pour potato mixture into filo-lined baking dish leaving at least 1/2 inch room from the top of the dish. Spread into an even layer and top with your sliced mushrooms. Sprinkle with a little extra ground black pepper and the chives. Gather the extra filo dough that was draped over the edge and crimp it together around the edge of the potato mixture. Brush more butter all over the filo crust, and bake for 20-30 minutes until middle has set and the filo is golden brown. The time will vary depending on the size and depth of your baking dish. Mine took a bit longer since it was so deep.

Let the tart set up for at least 15 minutes before cutting. Drizzle with a bit of truffle oil and sprinkle with fresh chives before serving.

Monday, November 8, 2010

Pumpkin Tartlets + A Giveaway!

** First and foremost, don't forget to enter the giveaway for a $45.00 CSN Stores gift certificate HERE. Just leave a comment on the linked post to enter before this Friday (11/12) at midnight! **


The Thanksgiving season has officially arrived. As of now, I have  four Thanksgiving celebrations to attend this November, and checked one of them off the list this past weekend. The hosts of the party were nice enough to provide the main meal, and just asked guest to bring a dessert and drinks. There ended up being about 20 different desserts at a party that had about 30 people at it, but somehow I managed to be the only one that brought some sort of pumpkin pie. What is thanksgiving without pumpkin pie?


I confess I am not really that into pumpkin pie, but it is just one of those things that has to be there on the table at the end of the meal. It's tradition! It's iconic! It's like the much neglected cranberry sauce, Thanksgiving just wouldn't be right without it.


This is a pretty standard, no frills pumpkin pie. I used my now-favorite pate brisee recipe for the crust, and Paula Deen's recipe for the filling (surprisingly it only has 1/2 stick of butter in it! Well the filling at least). Oh yes, and of course I made them miniature, I couldn't help myself. I liked them this way because there was a higher crust-to-filling ratio than a full sized pie. If you are one of those people that typically eats all the filling out of the pie and leaves the crust behind (not that there is anything wrong with that) this may not be the recipe for you.

 
Pumpkin Pie Tartlets
adapted from Food Network and Bourke Street Bakery Cookbook
Makes about 24 3 1/2 inch tartlets

1 batch pate brisee, rolled out to 1/8 inch thick sheets and chilled (see recipe here)
1 cup pumkpin puree
1/2 cup sugar
1/8 teaspoon salt
1 egg + 1 egg yolk, beaten
1/2 cup half and half
1/4 stick of butter (2 tablespoons) melted
4 ounces softened cream cheese
1/2 teaspoon vanilla
1/4 teaspoon ground cinnamon
1/4 teaspoon ground ginger

Using a 4 inch round cutter, cut 20-24 circles out of your pre-rolled pate brisee. Line each one of your tarts shells with one of the circles, being careful not to stretch the dough. Freeze lined tart shells for at least 20 minutes before baking.

Preheat oven to 400 degrees F.

In the bowl of a stand mixer fitted with the paddle attachment, combine the cream cheese and pumpkin and beat until combined. Add the sugar and salt and beat again until combined, scraping down the sides of the bowl. Add the egg and yolk, butter, half and half, and beat until combined. Add the vanilla, ginger, and cinnamon and beat just until incorporated.

Line tart shells with tin foil and fill with pie weights (I use beans or rice, whatever I have on hand). Par-bake your shells for about 10-12 minutes until they are just barely starting to brown and have dried out a bit.

Remove from oven, and take out the pie weights and tin foil and add a large spoonfull of the filling into each tart. Reduce oven heat to 350 F and bake for 40-45 minutes, until filling has set and the crust turns a golden brown.

Let cool completely on wire racks before un-molding from tart pans. Serve with fresh whipped cream, or nothing at all.


Here's to many more thanksgiving feasts to come!

Wednesday, November 3, 2010

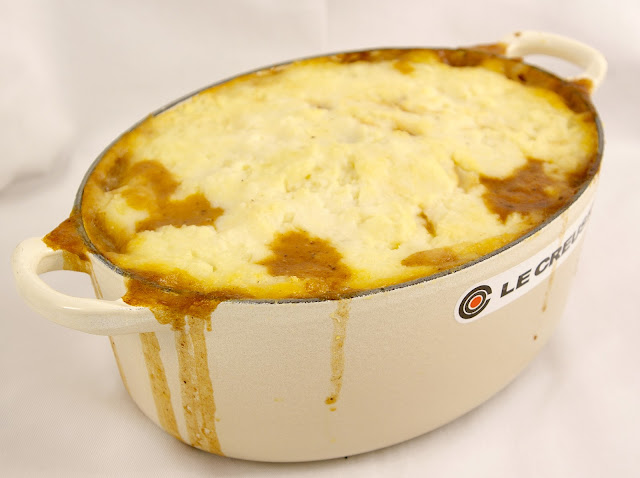
Greek-Style Shepard's Pie & A Giveaway!


I wish I could give away a dutch oven to each and every one of you. Seriously, I do. I love these things. To me, dutch ovens absolutely symbolize cold weather cooking. Though they are very heavy pieces of artillery, my two LeCrueset's have become an incredibly vital part of my kitchen. As soon as the weather turns brisk, my mind starts scheming to come up with new things to make in Big Red (that's what I call my 13-quart red Dutch oven, and yes I realize I am a huge nerd). 

Alas, I cannot give you a dutch oven, but I can do something to help those of you who are in need of one (or anything else in your kitchen artillery that you find you are missing). I am giving away a $45.00 gift card for CSN stores online! They have a huge selection of cookware and kitchen gadgets, and you can use this gift towards any of it. 

All you have to do is:

Leave me a comment on this post, telling me what your favorite thing to make in your dutch oven is? Or, if you don't have a dutch oven, what would be the first thing you would make if you did?

You have until next Friday, November 12th at midnight to enter. I will pick a winner at random, and you will be contacted by CSN stores to redeem your gift! 

Now, lets get on to the goodies. This may not be the most beautiful or photogenic dish, and it may not be the most fancy dish, but it is so so delicious. Tender eggplant and big chunks of beef, tons of oregano and a pecorino-garlic spiked mashed potato topping...I can barely handle it. I spied this on the cover of bon appetit about two years ago, and finally got around to making it this week, I can't believe I waited this long. It is chocked full of vegetables, tender cubes of braised beef, and topped with a creamy, starchy topping, it has all the things you want out of a traditional shepard's pie, with a few twists. 

I found my favorite way to eat this particular dish is in a mug. Preferably with a snuggie on. (I almost tried to smuggle home the snuggie I got my parents as a gag-gift for Christmas) Yes, I am ashamed. You can curl up on the couch and let this pie warm your hands and your belly. 

Greek - Style Shepard's Pie
serves 8-10

1 1/2 - 2 pounds eggplant, cut into 1/2 inch cubes
coarse salt
6-7 tablespoons olive oil
2-3 pounds beef, cubed into 1 inch pieces (I usually just buy the 'stew beef', pre-cut into small square pieces)
All-purpose flour
5-6 carrots, diced
3 cups chopped onions (I used about 2 1/2 large vidalia onions)
1 cup dry white wine
1 - 28 oz can of diced tomatoes
3 cups beef broth
8 garlic cloves, minced
1 tablespoon dried oregano
2 1/2 pounds russet potatoes, peeled and chopped
2 tablespoons unsalted butter
2 tablespoons olive oil
2 garlic cloves, minced
3/4 cups whole milk
1 1/4 cups grated Pecorino Romano cheese (if you can find the Greek Kasseri cheese, use that, I couldn't find any)

Spread the eggplant on a baking sheet and sprinkle with a small handful of coarse salt. Let sit at room temperature for about 1 hour, to pull the excess moisture out of the eggplant. Rinse eggplant with water to remove salt, and pat dry with paper towels. 

Heat 3 tablespoons of olive oil in a large heavy pot over high heat. Add eggplant, and saute until tender and browned, about 12-15 minutes. Transfer to bowl, and set aside. 

Season beef with salt and pepper, then toss with enough flour to lightly coat all the pieces. Heat a few tablespoons of oil in the same large pot over medium-high heat. Working in batches, if necessary, brown meat on all sides, about 8-10 minutes for each batch. Transfer beef to a bowl, and set aside.

If pot is dry, add another tablespoon of olive oil then add the onions. Saute the onions until tender and translucent, about 10 minutes. Add the wine to the pot and scrape up all the brown bits on the bottom of the pot. Cook for about 5 minutes, until most of wine has evaporated. Add tomatoes with juice, beef broth, garlic, and oregano, and bring to a boil. Add beef with any accumulated juice and carrots to pot, and bring to a simmer. Cover and simmer over low heat for 1 hour, stirring occasionally. Uncover and simmer over low heat for another 45 minutes.

While the filling is simmering, place your potatoes in a large pot and cover with cold water. Bring to a boil and cook until potatoes are fork tender, about 15 minutes.

Preheat oven to 375 degrees F.

Meanwhile, heat the two tablespoons of butter in a small saucepan over medium heat. Add garlic and saute just a minute, until fragrant. Add milk and bring to a simmer and turn off heat.

When the potatoes are cooked through, drain and return to pot, cooking over medium heat for a few minutes until excess water has evaporated. Crush potatoes with a potato masher, and add the milk, mashing until smooth. Stir in the cheese, season with salt and pepper, and keep covered until filling is done. 

You can either bake the pie in the dutch oven the you prepared the filling in if it is oven proof, or you can transfer the filling into a 9 x 13 baking dish. Top the filling with spoonfuls of the mashed potatoes, and spread gently into a even layer to seal in the edges. 

Bake until filling is bubbling and topping is golden brown, about 45 minutes. 


Tuesday, October 26, 2010

BOO!

I love Halloween. I love the decorations, the costumes, and the weather. I also love having an excuse to eat a whole bag of mini sized Butterfinger bars. Or a dozen little ghost shaped cake pops...


Don't they just beg to have their little heads bitten off? I realize I am evil. I have accepted that fact.


I made a special one in honor of my favorite Halloween movie, It's The Great Pumpkin Charlie Brown! 


Can't you just picture this little guy saying "I got a rock....."? Poor Charlie Brown, he depresses me a little. I would share my cake pops with him if I could, maybe he just needs some sugar. 


These pops would probably fit that bill. Just a touch of sugar on these little guys. They look like they have done something mischievous, yes? 


Too bad I didn't get a picture of the drunk looking ghosts. I may need to work on my piping skills.

This round of cake pops used a spooky black velvet cake with a dark gray cream cheese frosting. They WILL dye your mouth black, but only for a minute or two, I promise. Its worth it though. Maybe you could try working a black tinted mouth into your Halloween costume. Just sayin. 


Black Velvet Cake Pops with Cream Cheese Frosting (Ghosts and Pumpkins!)
makes about 40-50 cake pops, depending on how big you roll them 

Cake: 

2 1/2 cups cake flour
1 teaspoon baking powder
1 teaspoon salt
2 tablespoons unsweetened cocoa powder
1 - 1 ounce bottle of black liquid food coloring
1 cup unsalted butter, room temperature
1 1/2 cups sugar
2 eggs, room temperature
1 teaspoon vanilla extract
1 cup buttermilk, room temperature
1 teaspoon baking soda
1 teaspoon white vinegar

Butter and flour your cake pans and set aside. Preheat your oven to 350 degrees F.

In a large bowl sift the flour, baking powder, and salt. In a small bowl, mix the food coloring and cocoa powder until completely incorporated. Set aside.

In a stand mixer (or using a hand mixer) cream the butter and sugar on medium high speed until light and fluffy. Add the eggs one at a time, and beat until thoroughly combined, being sure to scrape down the sides. Add the vanilla and the red food coloring-cocoa mixture and beat well to combine. Add 1/3 of the flour mixture, beat on medium speed until combined, then add 1/2 of the buttermilk, and beat until incorporated. Add another 1/3 of the flour, beat well, then the other half of the buttermilk, scraping down the sides after each addition. Finish with the last 1/3 of the flour mixture and beat until just combined.

In a small bowl, mix the vinegar and baking soda, and immediately add to batter. Mix on high speed for just a few seconds until evenly dispersed, and pour right away into cake pans or lined cupcake pans.

Bake 2 9-inch cakes for about 40 minutes, or until a toothpick inserted into the middle comes out clean. Let cool completely before making your pops! 

Frosting: 

16 ounces cream cheese, softened
1/2 cup unsalted butter, room temperature
2-3 tablespoons black food coloring (enough to make the frosting a dark gray color)
1 teaspoon vanilla extract
2 1/2 cups confectioners sugar
pinch of salt

In a stand mixer, combine the cream cheese and butter, and beat on medium high speed until smooth. Add the vanilla and salt and mix until incorporated. Gradually add the sugar, and beat until light and fluffy, about 3-4 minutes.Beat in the food coloring until nice and dark. You want it to be dark enough so that your cake doesn't turn gray from adding a ton of fluffy white frosting.

Pops:

2-3 bags white candy melts
50 or so lollipop sticks
Cake, baked and cooled
Frosting, room temperature
black piping frosting (I just used Wilton ready-to-decorate icing tubes)
Orange sprinkles

When the cakes are room temperature, crumble them into a large bowl with your fingers until broken up into pea-sized bits. Mix in 1 and 1/4 cups of the frosting to start with, using either a large wooden spoon, or you hands if you want to get messy. Mix until the frosting is evenly dispersed. Take a quarter sized about of the cake mixture and try rolling it into a ball with the palms of your hands. If it stays together, continue to roll the rest of your cake mixture into balls and place them on a parchment or wax paper lined baking sheet. If they fall apart or do not hold together, add a little more frosting until the mix is moist enough to allow you to roll an intact ball. If you are making ghosts, mold into a tapered shape instead of a round ball.


Once you have rolled all the cake mix into balls or ghosts, place in refrigerator and chill for about 1 hour. When the cake balls have been chilled, melt a small amount of the candy melts in a microwave safe bowl according to package directions. Take one of the sticks, dip about 1/2 inch of the end into the melted candy and stick it about half to three-quarters of the way through the bottom flat part of the cake ball or ghost. Don't go too far into the cake ball, or it will fall apart. The candy melts will help adhere the stick to the cake.

Once the cake pops have been chilled, melt the rest of the package of candy melts according to package directions, and add your candy coloring, if using. I kept the majority of the cake pops in the freezer and took them out about 5 at a time. This way, the whole pan of cake pops doesn't come up to room temperature while you are dipping the first batch.  

One at a time, dip the cake pops into the melted candy coating being sure to get the coating all the way up over where the stick is attached to really seal it in. GENTLY tap off the excess coating on the edge of the bowl while rotating the cake pop, to get a even layer all the way around. 
Stick the coated pop ghost side up into a Styrofoam block to dry. If you are doing the sparkling pumpkins, coat with sprinkles immediately after dipping each pop. For the ghosts, let cake pops cool and dry for at least 30 minutes before piping the faces on.  Let all decorations set for at least an hour before packaging them up. They can be frozen in plastic Ziploc bags, if you put them in the refrigerator the candy coating will weep and become sticky. If you are not using cream cheese frosting, they can be kept at room temperature for a few days.

Sunday, October 24, 2010

Gingerbread Bundts with Cinnamon Glaze


What a lovely weekend it was. Busy, but wonderful. My good friend came down to visit and we baked pretty much the entire time she was here. Usually it is just me by myself in the kitchen, but it was nice to have some company, not to mention another pair of hands.


The apartment smelled amazing for about three days straight, it was like a freaking Yankee Candle Factory in here. The first of the treats that we made were mini gingerbread bundt cakes. These are incredibly easy to make and work both as dessert or breakfast, or dessert and breakfast.


The aroma from these cakes is absolutely heavenly, if 'coziness' had a smell, this would probably be it. Spicy and rich but not too sweet, I think these cakes would be an absolute crowd-pleaser for Thanksgiving or other fall gatherings.


Gingerbread Bundt Cakes with Cinnamon Glaze
adapted from La Cuisine d'Helene
makes 24 mini cakes

2 1/4 cups all purpose flour
1/2 teaspoon baking soda
1/2 teaspoon salt
1/2 teaspoon allspice
1/2 teaspoon ground cloves
1/2 teaspoon ground nutmeg
1 teaspoon cocoa powder
1 teaspoon ground cinnamon
2 teaspoons ground ginger
1 stick (8 tablespoons) unsalted butter, melted then brought to room temperature
3/4 cup dark molasses
3/4 cup sugar
1 large egg
1/2 cup buttermilk
1/2 cup whole milk

Butter and flour a 12-cup mini bundt pan and preheat your oven to 350 degrees Fahrenheit.

In a medium bowl whisk together the flour, baking soda, salt, allspice, cloves, nutmeg, cocoa powder, cinnamon, and ginger.

In the bowl of a stand mixer fitted with the paddle attachment, beat together the molasses, sugar, and butter until well combined. Add the egg, and beat until combined.

Slowly beat in the milk and buttermilk. It will look like it has curdled, but don't worry, this is supposed to happen. It will fix itself when you add the dry ingredients.

In a few additions, beat in the flour mixture, scraping down the sides of the bowl between each addition. Mix until just combined.

Fill each bundt pan cup about 3/4 the way full and smooth out the tops just a bit. Bake on the middle rack of the oven for 30 minutes, or until a toothpick inserted into the center of the cakes comes out clean.

Let cool in pan for about 20 minutes, then turn out onto a baking rack and cool completely.


Cinnamon Glaze

1 cup powdered sugar
3-4 tablespoons milk (this will depended on how thick or thin you want your glaze)
1/4 teaspoon cinnamon

Mix powdered sugar and milk together with a fork until smooth and desired thickness. Add cinnamon and mix to combine.

Dip the tops of each bundt cake in the glaze and let dry on a cooling rack.


If you are freezing the cakes, do so before you glaze them. Cakes can be stored at room temperature or in the refrigerator for a few days. They may get a bit soggy though, they will still taste great.

Saturday, October 16, 2010

What to do when you burn $150.00 worth of spare ribs.


There is a cabin in Cumberland, WI that is cursed. Evil spirits are lurking in the oven, and in the electrical box, and in the vintage Weber gas grill. Last summer, the spirits decided I was doomed to cook dinner with no power, in the dark with a flashlight, having to cook everything on the grill. This summer, they wanted to play with fire, and play with fire they did.


The theme for this year's summer cabin weekend was "Lets burn everything!!". Stefanie burned the pizza bread, Heather burned the bacon, and I burned the crap out of $150.00 worth of spare ribs. I have made these before, on the same grill, under the same conditions, but this year just wasn't my year. I think this grill hasn't really been cleaned thoroughly since about 1972, and there were uncontrollable grease fires, which then led to very unstable temperatures. I thought after the first two rounds of: fire-take the ribs off the grill-tame the fire-put the ribs back on the grill-try to get the grill hot again, that we were golden. Oh boy was I wrong. I put the ribs into stage two: wrapped with tin foil with liquids for steaming and went and played a very competitive game of bocce ball. When I came back about 45 minutes later, they were burnt to a crisp, stuck to the tin foil.


It was awful. This is something I am usually good at, and not only did I screw it up, they looked inedible. After a few tears, a LOT of swearing, and a large glass of wine to calm me down, I told someone to grab me two sheet pans and 8 forks. My team got to work, pulling the burnt bits off, and shredding the rest of the meat that was salvageable. I tossed all the meat with the vat of glaze that was supposed to go on during phase three, and put them back on the grill to bake for about an hour. The rest of the cooking went off without a hitch, smashed potatoes and cheesy corn rounded out the meal.


The verdict? It tasted exactly the same as last year, but now you could eat it with a fork, which I personally think is much less fun than tearing it off the bone with your teeth. It did however, make for a less messy and more civilized meal, but all I cared about was saving dinner. I mean, there isn't exactly a large selection of take-out places in Cumberland, WI. Most of all, I was happy to be with my best friends in the world, enjoying and laughing about yet another meal that almost didn't happen.


The best part of the shredded rib meat? Making sandwiches the next day. The ribs have a lot of Asian flavors in the glaze and the rub, so I made a big 'ol batch of this spicy cilantro coleslaw. Put the two together and you have some of the best sandwiches ever. Make this coleslaw regardless though, it is seriously amazing.


Spicy Asian Coleslaw
adapted from Kalyn's Kitchen


**This makes an absolute ridiculous amount of slaw, so I mix all the veggies, onions, and cilantro and freeze half of it for a later date.


Also, I use my food processor to shred all the vegetables. You can core and cut the cabbage into 2-inch slices then put though the slicer blade. I then use the slicer blade for the peas, and the grater blade for the carrots. If you don't have a food processor, you can just chop and grate everything by hand, it will just take longer.**


1 head green cabbage, shredded
4-5 medium carrots, shredded
1 bag sugar snap peas, sliced thinly
1 bunch green onions, white and green parts sliced thinly
1 bunch cilantro, chopped
1 cup peanuts, chopped


4 tablespoons rice vinegar
2 tablespoons honey
2 tablespoons dijon mustard
4 teaspoons sesame oil
4 teaspoons soy sauce
2 teaspoons sriracha (a spicy red chili paste that you should have in your fridge at all times, trust me)
1/2 cup canola or peanut oil


Combine all shredded vegetables with the green onions and cilantro in a large bowl. In a small mixing bowl combine the vinegar, honey, mustard, sesame oil, soy sauce, sriracha, and peanut oil, and whisk to emulsify.


If you are making this for a large group, you can dress the cabbage mixture and toss with the peanuts right before serving. If you are making this for yourself and plan on eating it for lunch all week like I do, you can store the cabbage mixture in one container, the dressing separately, and the peanuts in a ziploc bag. I only combine what I am going to be eating immediately before consumption. This allows you to store your slaw for much, much longer than if you mix it all together, as cabbage can get soggy quickly.


You can eat a big bowl of this on its own, add some grilled chicken, or top your shredded rib meat on a french roll with it like I did. This winter, if you ever have leftover braised beef, this would be a great way to liven up your leftovers.


When something goes very wrong in the kitchen, keep calm (I myself don't usually take that advice, I admit) and get creative. Know that it will still probably be delicious, and if not, well you have a funny story to tell later. If anyone has any kitchen disasters that turned into a triumph, please let me know in the comments!

Pin It

LinkWithin

Related Posts with Thumbnails