Showing posts with label 4 Tiered Cake. Show all posts

Wednesday, March 18, 2015

Cake-a-palooza Day 6


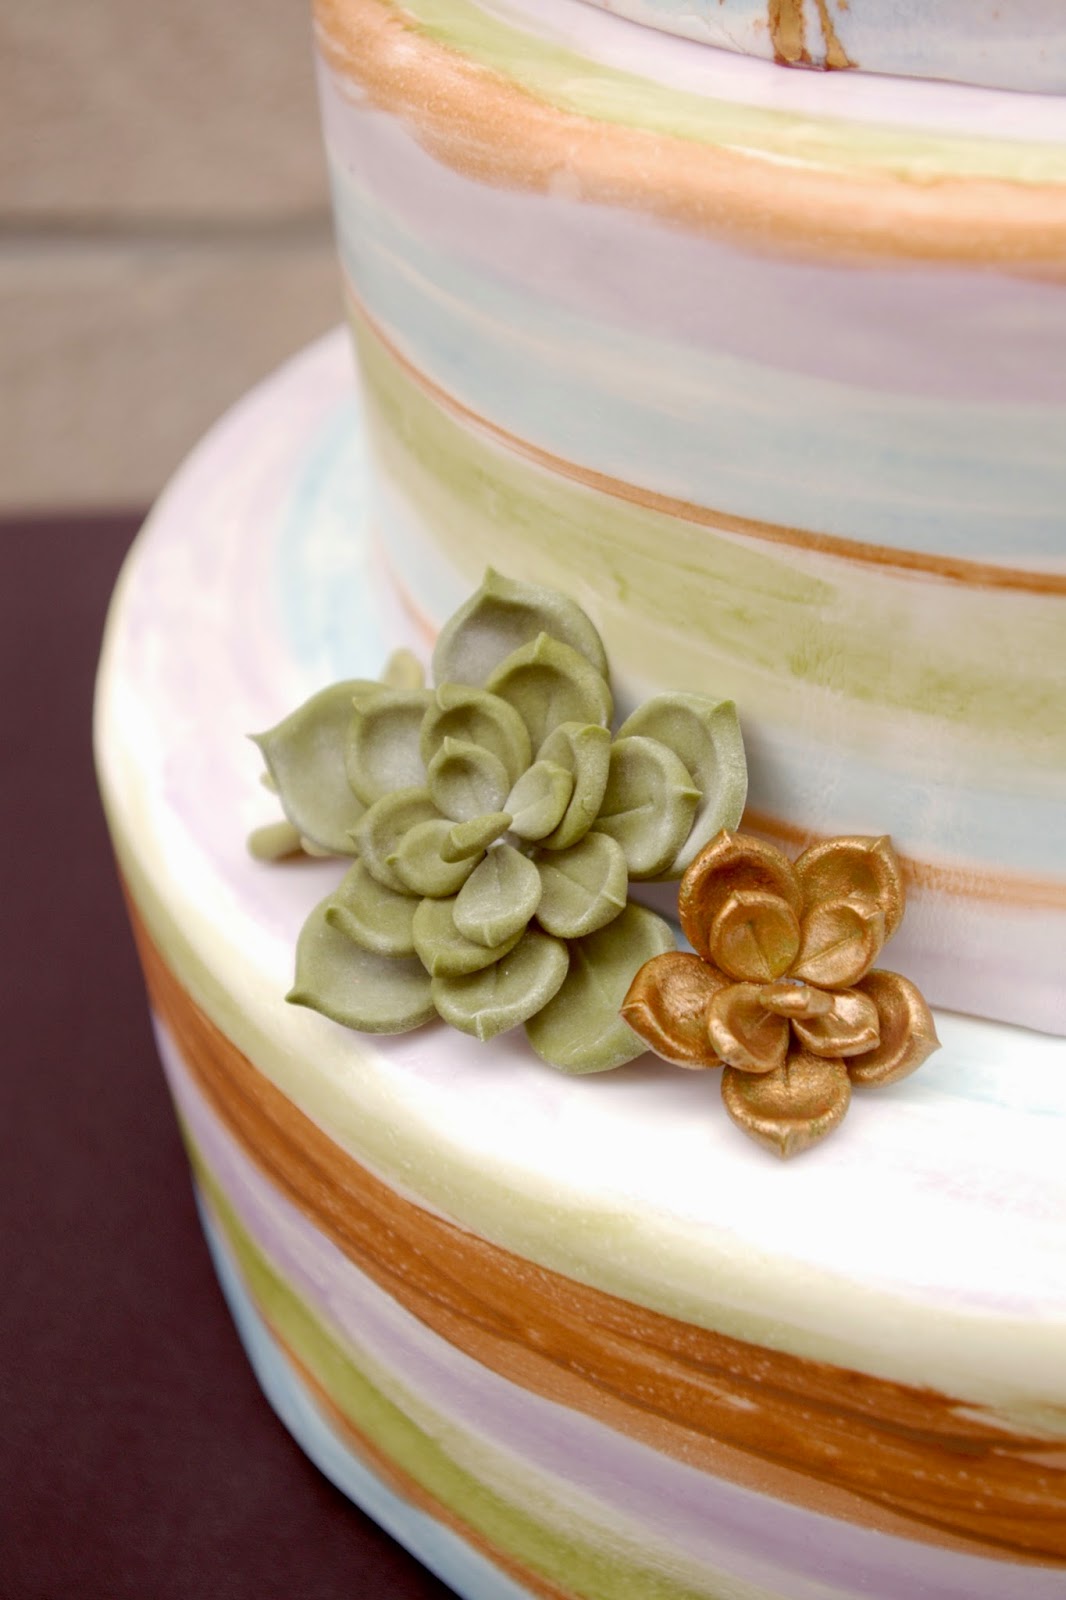
Three weeks and five posts later, I am finally back with the last cake. I have had the chance to design and create so many cakes in the past few months, it is hard to pick a favorite but this one is definitely up there. This is one of those cakes that makes me so excited for wedding season to get into full swing, and even though we may not be making cakes like this every weekend, there are some great designs lined up for the summer.


For now though, we have been getting in lots of practice with our window displays. We decided to go for a theme for the main window in the shop this time around, a modern spin on a midsummer nights dream. Succulents, muted purples and greens with a touch of metallics, plus a suggestion of lit vines dripping down from above, all come together in this 4-tiered stunner.


March is here, April is on the way, and then wedding season will be here before I know it. Stay tuned.

***Cake made by Bria Helgerson for Sugar Fixe Patisserie***


Tuesday, February 24, 2015

Cake-a-palooza Day 3


I'm gonna make this short since it has been a VERY long day and there is a glass of wine calling my name. So let's talk about this cake, which I have so lovingly named 'big blue'. This isn't a cake for the traditionalist, or the romantic. This cake is for someone who likes a little quirk, a little mod, maybe even a little hint of southwest flair. All of those things go together right? 


Right. This cake allowed me to practice one of my new favorite mediums. I have long been a user of petal dusts and luster dusts, but up until recently have only been using them by themselves, or mixed with alcohol. I may have been a little late to the game, but mixing dusts with a small amount of cooking oil, produces a much different, silky smooth finish. It also allows for a much more fluid brush stroke, which is how I created the pattern on the bottom two tiers. 


The feathers were also a first for me, and they almost became the death of me. Gum paste flowers have nothing on feathers when it comes to fragility, but the statement they make on this cake makes all the breakage and heartbreak worth it. 


**This cake was designed and made by Bria Helgerson for Sugar Fixe Patisserie. 

Wednesday, June 25, 2014

Ranunculus and Succulents...say that ten times fast.


I keep calling it spring. Even though I know it is officially summer, I just cannot seem to get it through my head. Spring has once again flown by without notice, and all of the sudden it is 85 degrees and sunny everyday. Well, almost every day. Usually on my days off from work it rains, so there's that.


Cake season is in full swing, and I have been cranking out wedding cakes at the restaurant like it's my job. Because it is my job, or was my job I suppose. I finished up the last wedding cake I will be doing at the restaurant this past weekend, after some hard decisions were made. I have been pushing and pushing for the last year to keep wedding cakes on the table as an option for our events, because it truly is the favorite part of my job. I learned, however, in this past year that plating desserts and charcuterie boards for service while trying to do watercolor work on a 4 tiered cake or attaching 50 tiny little gum paste petals to a sugar flower, is near impossible. I wasn't achieving the quality of work on my cakes that I know I am capable of, and that is a big disappointment.


So, for now, it's back to regular service at the restaurant, and the wedding cakes will move back into my own personal kitchen for the time being. I have taken for granted how much easier it is to bang out a four tiered cake when you have a large mixer and lots of full size sheet pans. For the next week and a half, it is back to baking at the apartment for a 4th of July wedding in Wisconsin.


These two cakes were by far my favorite from this spring's wedding season. The clients on both of these expressed that they loved my cakes and pretty much let me do whatever I wanted, with a bit of inspiration direction. I was able to push out of my comfort zone a bit, doing gum paste flowers that I hadn't attempted before including the ranunculus, and succulents. I also took my first swing at watercoloring an entire cake. There is something truly terrifying and incredibly awesome about taking a blue soaked paintbrush to a perfectly white, fondant-covered cake 3 hours before the start of a wedding. It wasn't perfect, but I learned a lot in the process and hope that I get a chance to do it again soon.

So, happy summer to all, I for one can't wait to see what this season has in store. Changes, growth, and more new challenges, or perhaps just more rain on my off days. Only time will tell.

Wednesday, June 26, 2013

Buttercream Beauties


I think its safe to say buttercream is BACK. Not that it ever went away completely, but after years (decades even?) of playing second string to fondant, buttercream-covered wedding cakes are making a comeback.


Maybe its the blossoming culture of relaxed bridal "rules", or the trend of rustic-chic wedding decor, or it could be valuing taste over perfection, but more and more brides are eschewing fondant for the cake of their dreams.


I have a few opinions on fondant, some of them conflicting. There is a time and a place for fondant cakes. Many of these times and places happen to be weddings, but I don't see it as a necessity anymore . Once upon a time, and I was recently told this by a VERY traditional, VERY southern mother of the bride, the cake represented the 'bride', and therefore needed to be white. Pure white, inside and out. She was not very happy with the bride wanting my buttercream on the outside, and buttermilk cake on the inside, both of which are made with butter, and therefore not pure white. I explained that I do not use shortening or imitation vanilla extract which results in my frosting being a very slightly off white, but that the flavor and texture is unbeatable. For my cakes, if you want pure white, it has to be fondant, I simply will not compromise the quality of my ingredients for color.


If your primary goal with the cake is design, and tying it perfectly into the theme or color scheme of your event, then fondant may be the obvious way to go. On the other hand, I would say 90% of people end up peeling it off before consumption, or just eating around it. It truly is for aesthetic purposes only, albeit an edible one. Don't get me wrong, I love making edible artworks with fondant, but sometimes, buttercream is best.


Sometimes, simplicity makes for a stunning cake on its own, without all the adornment of details and adornments. These two cakes were my first of many this wedding season and I think they kicked it off with a great start. More to come, so stay tuned.


Thursday, November 8, 2012

The Art of Impermanance


For some reason or another, I have been putting off writing this post. Whether it's sheer laziness on my part, or the thought that I really don't want to write about food after working at the restaurant all week, I just couldn't get it started. Maybe it's the fact that I didn't want to just write another superfluous post about a wedding cake that I made for person a, and it contains a,b, and c, flavors, and it was this (insert difficult sounding adjective here) hard to make. Maybe it was the fact that I am feeling guilty that the person I made this cake for is one of my very best friends, and I haven't talk to her in far too long. Maybe it's because this was the last of the wedding cakes for the year, and I am sad to know there won't be any more for the next few months. So, here I am, holding onto the pictures in hopes that they will tide me over until the next one comes along.


But that's the thing about this industry, they are just pictures. There is no cake left (I sincerely hope not) to eat, or gumpaste flowers to swoon over, they are long gone. In my previous life as a product designer my art was permanent. It was sketched, modeled, and produced in various materials, such as plastic, metal, fabric. The sketches were filed, documents backed up, and finished products were sold to eager consumers. It's all still around in one way or another, but my new art is so much different. My new art is the epitome of impermanence and its been quite the adjustment.


I wonder if I will ever get used to watching my cakes be cut and completely disassembled in five minutes flat. Something that I put hours and hours into is destroyed in less time than it took to mix and bake just one of the many layers it contains. The consolation of course is when the client, be it your best friend or someone you've met only once, takes that first bite and an exstatic smile starts spreading across their face. This is when your nerves calm, and the heartbreak you experience from watching the knife stab through the intricate decorations starts to subside, and you remember this is what it's all about. In that one moment, you get to make someone really happy. They are celebrating something big, whether it be a birthday, wedding, baby or engagement, and they just ate something that will stick in their memory for years to come.

The satisfaction of that moment is enough, and it has to be to keep on going in this industry. Unless I start making styrofoam cakes and decorating my apartment with them...just kidding.


There were some new flavors in this cake that I just have to share with you. The groom is from florida and the bride requested that two of the tiers resemble key lime pie in some way. I went through a few variations and quickly found a winner. The cake is a richly flavored vanilla cake with buttermilk and lime zest, filled with key lime curd, and brought over the top with coconut buttercream. It was like florida on a plate, or so I was told, I haven't been to florida in years so I will reserve judgment.

Key Lime Cake
adapted from Bon Apetit
This recipe makes 2 fairly thin 9 inch rounds, I like to double it and make three thicker layers, I pretty much always go for a taller cake.

1 cup ap flour
3/4 cup cake flour, sifted
1/2 tsp baking powder
1/2 tsp baking soda
1/2 tsp salt
1/2 cup butter, room temperature
1 1/4 cup granulated sugar
2 eggs
2 1/2 tbl key lime juice
1 tbl key lime zest
1 tsp vanilla extract
3/4 cup buttermilk

Preheat oven to 350 degrees F. Line pans with parchment, and lightly butter and flour sides. In a medium bowl, whisk together the flours, baking powder, baking soda, and salt. In a stand mixer, cream together the butter and sugar. Add the eggs, one at a time, scraping the bowl between each addition. Add the lime juice, zest, and vanilla, and mix to combine. Add 1/3 of the flour mixture, mix just to combine, scrape bowl. Add half the buttermilk, mix to combine, scrape bowl. Add another third of the flour, followed by the remainder of the buttermilk, and the remainder of the flour, scraping well between each addition.

Divide batter between pans, and bake for 20-25 minutes, or until top of cake springs back completely when gently pushed with your index finger. Let cool in pans for about 5-10 minutes, then turn out and cool completely.

Key Lime Curd
adapted from Ina Garten
Makes about 3 cups, I add a little gelatin to this recipe when I use to to fill cakes. It makes it much more sturdy and you wont have to worry about it running out the sides of the cake (not that I have had that happen, I swear).

Zest of 4 limes
1 1/2 cups sugar
1/4 pound butter, room temperature
4 eggs
1/2 cup key lime juice
pinch of salt
1 tsp gelatin
1 tbl water

Place sugar and zest in a food processor and pulse until zest and sugar are finely ground together. Place the sugar into a large, heavy saucepan, but do not place over heat yet. Whisk together the sugar and butter, then add the eggs, one at a time, mixing until completely incorporated after each addition. Add the lime juice and salt, then place over medium heat and cook until the temperature reaches 175 degrees F, whisking vigorously constantly. Remove from heat. Bloom gelatin in the water and let stand for about 5 minutes. Heat gelatin in the microwave  for 5 second intervals, just until it melts completely. Whisk the hot gelatin into the still warm lime curd. Transfer curd to a bowl, cover, and refrigerate until set, at least 4 hours, before using.

Coconut Buttercream

4 oz egg whites
2 oz water
8 oz sugar
12 oz butter
1/2 tsp vanilla extract
1/2 coconut extract

Place egg whites in the bowl of your stand mixer fitted with the whisk attachment and begin whipping the whites on medium-high speed. Place the sugar and water in a small saucepan and using a candy thermometer, heat the sugar to soft ball stage, or 240 F. The eggs at this point should  be voluminous and frothy. Slowly pour the sugar into the egg whites in a steady stream, while the mixer is on high.
Let the mixer run on high (I usually set it to one number below the very highest setting) until the mixture has cooled completely. Switch to the paddle attachment, and add the butter one tablespoon at a time, mixing on a medium-low speed. Once all the butter has been added, turn your mixer to high and whip for 3-5 minutes until frosting is light and smooth. Add the vanilla and coconut extracts.


Special shout-out to my mom for helping me with these cakes, and the over 100 cake pops that were made for this wedding, especially for helping me cut out each and every of the hundreds of fondant flowers that cover the sides of this cake. Thank you to Erica for taking all the lovely pictures, so that I didn't have to! Last but not least, congratulations to my best friend Heather, and her best friend Matt, you two are so incredibly lucky to have each other, and I love you both.

Monday, June 27, 2011

Going Pro

A little over a year ago, I began my journey into the pastry world. I made a few tarts for a bridal shower last spring, which turned into making a few hundred mini desserts for a wedding last summer, which then turned into my first wedding cake in the fall. Now, a year later I am halfway through pastry school and just finished my biggest baking accomplishment yet. A four tiered wedding cake for two of my best friends. Four flavors of cake, 200 macarons, and one amazing wedding weekend later, I have come to the realization of how much life has changed in just a few months. 


For a long time, I was insistent that baking and cooking was just purely a hobby, and that no, I would not be pursuing it professionally. As a food blogger, I am sure we all get it in our heads at one point that we would love to make our hobby into a career, but always hearing and believing that it was not realistic. Just because you write about food, and love to bake, that does not make you a professional. This is true, but why should that stop you from turning baking/cooking from something you do in your free time, to a fulfilling and satisfying career? I heard an interview with funny man Conan O'Brien a few weeks ago and he said something along the lines of 'turning the thing you love into a career is like playing with fire'.  It's true there is a chance that even though you love it, you may not be good enough at it to turn it into a profession. There is also the chance that if you start doing what was once fun and relaxing as a job day in and day out, it may turn into just that, a job that you no longer look forward to, and then you may have lost a hobby. 


Well, I am taking that risk. Life is too short to be trucking along on a career path that you don't love. It's rare that people can find something that they enjoy and can make a living at, and if you happen to stumble across that, I think you have to go for it. This week I was offered a job at an amazing bakery working for an incredibly talented pastry chef, and I didn't even have to think about my answer. The calm and collected energy in that bakery and the attitude of the owner and the other employees there, made me instantly feel ready to jump in. I am so excited to start this new chapter in my life, because if I get to make things like this cake EVERY week, I think I will be one happy camper. 


Now, about that cake and those macarons! All of the flavors turned out great, and they all kept their intense moistness even after a twelve hour journey up to northern Minnesota. Here are the recipes I used for the cake:


I also made about 200 macarons, in four different flavors. Pistachio macs with white chocolate ganache, yellow macs with lemon curd, orange macs with peach marmalade buttercream, and my favorite, Earl Grey macarons with a orange buttercream. 


If you follow this blog at all you know that I have attempted macarons many times, and have been getting pretty close to getting them perfect. Each time I make them they get better, but I made two key changes this time that I think have made all the difference. First, I am using a different recipe that I found at Not So Humble Pie, I found that it works better for me in my kitchen than the one I had been using previously. Secondly, and most importantly, I left my stand mixer in the cupboard and used my hand mixer for the meringue. Previous to this change, my meringue never got that shiny smooth firm peak that you are supposed to achieve when making the macs. It's a wonder they ever turned out at all before this. 


Earl Grey Macarons with Orange Scented Buttercream
adapted from Not So Humble Pie
yields about 60-70 shells

120 grams almond meal
200 grams powdered sugar
100 grams egg whites
35 grams granulated sugar
tea from 2 earl grey tea bags
black food coloring

Line 3 baking sheets with silpats or parchment paper. 

In your food processor, combine the powdered sugar, almond meal and early grey tea, and pulse a few times to combine, until tea is ground finely. Pour into a small bowl and set aside.

In a medium bowl beat the egg whites on medium high speed with your hand mixer until foamy, then gradually add the sugar and beat until a nice glossy meringue forms. This should take a minute or two on a medium high speed. It should look like shaving cream. Add your food coloring, and mix on low speed just until incorporated. 

Add half of the powdered sugar/almond mixture. With a large spatula, quickly fold the egg whites over themselves to let some of the air out, combining with the almond mixture. Add the rest of the almond mixture and fold gently until your batter has come together, no more than 50 strokes or so. You want a batter that if you let a clump fall off your spatula, it will spread and meld back into itself within ten seconds. If it stands up and does not spread at all, give the batter a few more folds until it does. My best advice here is to test it frequently when you think you are starting to get close to the end product, this will help you to not over mix your batter.

Spoon batter into a piping bag fitted with a plain round tip (one with a fairly large opening). Pipe 1 1/2 inch rounds, evenly spaced, onto your baking sheet. Once all the macarons have been piped, pick up your baking sheet and drop it from about 6 inches above the counter. This impact will bring any air bubbles to the top of the macarons, and help them spread evenly. Do this a few times, then let the macarons sit at room temperature for about an hour before baking. This will create those nice crispy shells and will help prevent the tops from cracking while baking.

After the shells have rested, preheat oven to 290 degrees F, place one rack on the top shelf, and set an empty baking sheet on the rack. I have found this helps them not get too brown before they are done baking. Bake the macarons one pan at a time in the middle of the oven for about 18-20 minutes, depending on how big you piped them.

Honestly the best way to tell if they are done, is to sacrifice one of your shells, pop it off the parchment and break it open. If it is gooey inside, bake for another few minutes, if it is done, take them out. If they are overdone, not to worry, after filling them and letting them age in the refrigerator for a day or two, they will most likely still be delicious.

Let them cool on the baking sheet for a few minutes, then using a small offset spatula if needed to assist, gently pop them off the silpat and let them cool completely on a cooling rack. 

Orange Italian Meringue Buttercream

4 oz egg whites
8 oz granulated sugar
2 oz water
12 oz unsalted butter, room temperature, cubed
1 tsp vanilla
zest of 1 large orange

Place your egg whites in the bowl of your stand mixer fitted with the whisk attachment. 

Heat the sugar and water in a small sauce pan over high heat. Using a candy thermometer, bring the sugar to a boil and continue cooking until it reaches 230 degrees F. When it hits that temperature, turn your stand mixer to medium to begin mixing the egg whites until they are foamy. When the temperature hits 240 F, remove from heat and slowly pour into the egg whites on a medium low speed. As soon as all of the sugar is in, turn the mixer to medium high and mix until the meringue is cool to touch. Add the butter a few tablespoons at a time and whip until thick. Add the orange zest and mix to incorporate.

Pipe about a teaspoon onto half of the macaron shells, and sandwich with another shell. Refrigerate for at least 24 hours before consuming. You can also freeze filled or unfilled macarons for a few weeks, just thaw filled macs in the fridge overnight. 


***Thanks to Mad Chicken Studio for the beautiful pictures of the cake and macarons, and to La Petite Fleur for the lovely flowers***

Pin It

LinkWithin

Related Posts with Thumbnails