Tuesday, October 27, 2009

Finally.


There has been a hole in my life since moving out of Lincoln Park. I lived close to the lake for two years, on the north side of Chicago. I was steps from Wrigley Field, near the Belmont harbor where mini sailboats bounced about during their Saturday morning lessons, and just a block away from the lakefront path where I used to ride my bike.

All of these conveniences and attractions were great, but I don't feel I took advantage of them enough while I was there, leaving me not missing them all that much. They are still there when I want to visit. One of the things I do miss however is being in the small delivery area of Thai Classic Restaurant.

Yeah, I know this sounds a little extreme. But you do not want to get between this woman and her curry. I am sure there are better Thai places in Chicago, and there may even be some in my new hood, but I just loved the solid, dependable, consistent panang curry entree from the Classic.

For years I have been making 'curry' at home. I use the quotes because it never tasted anywhere close to what I have been enjoying at Thai and Indian eateries. It started with a recipe on the label on the back of a Thai Kitchen curry paste jar, and pretty much went downhill from there. Don't get me wrong, a little curry paste and coconut milk mixed with some veggies and rice were okay for a while, but I think I hit my limit of half-assed curry. I needed a real curry, and I needed to be able to make it myself.

Well I FINALLY found it. This recipe for chicken curry with cashews was recommended on a forum on Serious Eats, which is a food website that I am a daily visitor to. It may be a little more demanding, but this recipe hits all the right notes. The layers of flavor, the different textures, the heat, it all adds up to a dish that will cure me of my longing for Thai Classic any day.

Of course I toyed with it quite a bit, but that is the best part about this recipe, it just begs to be messed with. The base for the sauce is the key here, but the additions are up to you. As for me, I went light on the meat, and heavy on the veggies. This abundance of vegetables, combined with the yogurt addition, led me to believe that this is a healthy meal, we will just ignore the 1/2 stick of butter and the giant mound of jasmine rice shall we?

Chicken Curry with Cashews and Yogurt
adapted from Gourmet Magazine

1/2 stick (1/4 cup) unsalted butter
2 medium onions, halved and sliced thinly (2 cups)
2 large garlic cloves, finely chopped
1 tablespoon finely chopped peeled fresh ginger
3 tablespoons curry powder
2 teaspoons salt
1 teaspoon ground cumin
1/2 teaspoon cayenne
4 boneless chicken thighs, cut into 1 inch pieces
2 large tomatoes, peeled and roughly chopped - if tomatoes are not ripe/in season you can omit the chicken stock and use 1 14.5 ounce can of diced tomatoes and their juices.
2 cups chicken stock
1 red bell pepper, sliced into thin strips
1 can chickpeas, drained
1 can bamboo shoots, drained
1/4 cup chopped fresh cilantro
3/4 cup cashews (1/4 pound)
3/4 cup plain yogurt

Heat the butter in a large skillet over medium-low heat, until it starts to bubble. Add the onions, bell peppers, garlic and ginger and cook until softened, about 8 minutes. Add the curry powder, salt, cumin, and cayenne and stir to combine. Add the chicken thighs and cook just until browned on all sides, about 6-8 minutes. Add the tomatoes, chicken stock, chickpeas, bamboo shoots, and cilantro and simmer over medium-low heat until the chicken and all the vegetables have cooked through and sauce is reduced, about 30-40 minutes.

Feel free to add more chicken broth if the sauce reduces too quickly, I believe that the long slow simmer is where you get a lot of your flavor from here, so give it some time.

While curry is cooking, pulse the cashews in a food processor or spice mill until finely ground, almost to a powder, but careful not to go to far otherwise you will end up with cashew butter. Just before serving, stir the yogurt and most of the ground cashews into the curry to thicken the sauce.

Garnish with come chopped cilantro and reserved cashew powder, and serve over jasmine or brown rice.

Who needs you anyway Thai Classic. It may not be traditional panang, or even Thai, but it sure is delicious and feeds that little guy that lives in my tummy that screams 'feed me curry!!' every now and then.

Monday, October 26, 2009

Fall = Soup


As soon as fall started appearing around here, I got excited to start making soup. Maybe a leeetle too excited. I just really like soup okay?

I also really like cauliflower, especially when the word 'creamy' is involved. And the word 'bacon'.

This velvety soup is so comforting, and extremely easy. Pureed cauliflower, shallots, and chicken stock, thickened with a bit of cream, and topped with some prosciutto-toasted bread crumbs, this soup is hearty and fairly healthy. You could easily cut out some of the butter and the cream, and I suppose the prosciutto, but then you would really just have creamed cauliflower, and that's no fun. But, whatever mixes your meatloaf I guess.

Cauliflower Soup with Crispy Prosciutto Breadcrumbs

4 tablespoons butter
4 medium-large shallots, sliced
3 cloves garlic, minced
4 sprigs thyme
1 bay leaf
2 medium heads cauliflower, cut into 2-inch florets
5 1/2 cups chicken stock
1 cup dry white wine
1/2 cup heavy cream
salt and pepper
6 ounces prosciutto or pancetta, chopped into small bits (the original recipe called for chorizo, I couldn't find any, but prosciutto worked beautifully and tasted great)
3/4 cup panko breadcrumbs

In a large heavy pot, melt the butter and add the shallots, garlic, thyme, and bay leaf. Saute until the shallots have softened and have slightly caramelized, about 5-7 minutes. Add the cauliflower, chicken stock, and white wine and bring to a simmer. Cover and cook about 20 minutes, until the cauliflower is fork-tender.

Discard the thyme sprigs and bay leaf. In small batches, puree the cauliflower mixture in a food processor, or you can use an immersion blender right in the pot. Make sure to puree it thoroughly, it may separate if the cauliflower bits are too large and heavy. I let each batch process for at least 30 seconds.

Pour soup back into empty pot, and place over medium-low heat to heat it back up. Stir in the cream and season to taste with salt and pepper.

While this comes back up to temperature, sauté the prosciutto in a small non stick skillet over medium heat until it becomes crispy, about 3-5 minutes. Add the panko and toss with the prosciutto. Toast, stirring frequently, until the breadcrumbs are brown and crispy.

Ladle the soup into bowls and top with the prosciutto mixture. Serve immediately.

Cheers!

Monday, October 19, 2009

Thanksgiving dress rehearsal, part deux.


The remaining parts of our fall feast, lemon popovers, roasted carrots and parsnips, and plum tart for dessert were probably my favorite parts of the meal. I am usually the person at thanksgiving ignoring the turkey and stuffing and gorging myself on corn, Brussels sprouts, and my grandma's homemade buns. Side dishes are not to be ignored.

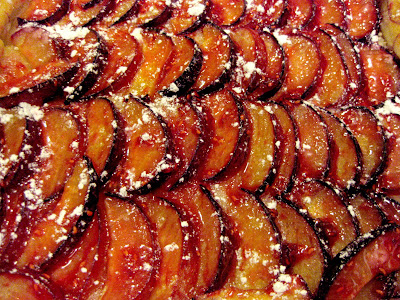
Dessert was incredibly easy. I can't really take credit for making it, I really just assembled parts and put it in the oven. Frozen puff pastry, ripe plums, homemade raspberry jam, and some fresh whipped cream made for a delightfully light yet decadent ending to the meal.

Roasted Carrots and Parsnips

When carrots and parsnips are roasted, they become caramelized and end up like sweet little candies. I like to add some cayenne pepper to offset the sweetness a bit and give them a little kick.

2 pounds of carrots, chopped on diagonal into 1/2 inch thick chunks
1 pound parsnips, chopped on diagonal into 1/2 inch chunks
Kosher Salt
Freshly ground black pepper
2 tablespoons olive oil
1 tablespoon fresh minced thyme
1 teaspoon cayenne pepper

Preheat oven to 425 degrees.

Toss all ingredients in a large bowl to coat the vegtables. Spread evenly on a baking sheet (I use a sil-pat for even cooking, no sticking, and easy cleanup) and roast for about 30 minutes until the carrots and parsnips are caramelized and cooked through.

Lemon Popovers
adapted (barely) from Food & Wine Magazine

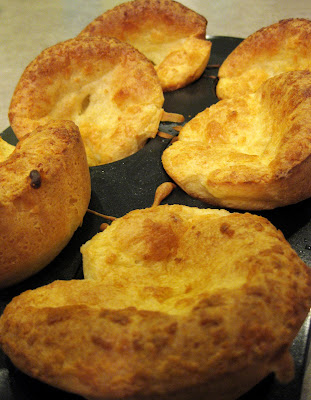
I don't have a popover pan, but I saw this recipe in food and wine for making them in a muffin pan. It worked great, they were just a little more stout than regular popovers. I used lemon zest instead of orange, since that is what I had on hand, but will definitely be trying them with orange in the near future.

3 large eggs, room temperature
1 tablespoon sugar
1 teaspoon lemon zest
1 1/4 cups milk
3 tablespoons plus 1 tablespoon unsalted butter, melted and divided
1 1/4 cups all purpose flour
1/2 teaspoon baking powder
1/2 teaspoon salt

Preheat oven to 425 degrees. In a large bowl whisk together the eggs, sugar, and lemon zest. Add the milk and 3 tablespoons melted butter and whisk to combine. In another bowl, whisk the flour, baking soda, and salt. Add the wet ingredients into the flour mixture and whisk until combined with only small lumps remaining.

Brush the cups of a 12-cup muffin tin (or two 6-cup tins) with the remaining melted butter. Place the buttered muffin tins into the preheated oven for 5 minutes, until butter starts to bubble and brown. Carefully fill the muffin tins half to three-fourths the way full with the popover batter. Bake the popovers for about 30 minutes until they pop over the muffin cups and are golden brown.

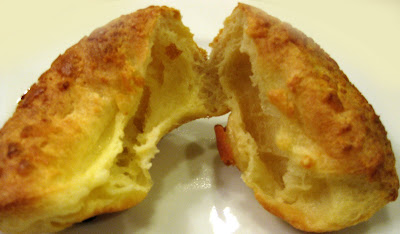
When they come out of the oven, stick each one with a knife to let the steam out so they don't get soggy on the inside. Serve right away. They are great with just a bit of butter, or also with some jam or preserves.

Plum - Raspberry Tart

1 sheet frozen puff pastry, thawed
3 small plums, pitted, quartered, then very thinly sliced
1/4 cup raspberry jam or preserves
1 egg
2 teaspoons water
2 tablespoons sugar
1 cup heavy whipping cream
2 tablespoons confectioners sugar, plus more for dusting

Preheat oven to 400 degrees.

Unfold thawed puff pastry on a sil-pat or parchment paper lined baking sheet. Poke the pastry with a fork all over leaving a 1 1/2 inch border around the edges 'un-poked'. This will help the center stay flat under the fruit, and the edges puff up around the filling.

Arranged plum slices in rows on puff pastry leaving a 1 1/2 inch border around each side. Fold edges of pastry over to encase the plums. Beat the egg together with the water, and brush it on the top of the puff pastry edges. Sprinkle the sugar over the plum center. Bake until pastry is golden brown and plums are bubbly, about 20 minutes.

While the pastry is baking, heat the jam or preserves in a small saucepan over low heat until warm.

In a large bowl, combine the heavy cream with the confectioners sugar and beat with a hand mixer until it forms soft peaks.

Once the tart comes out of the oven, brush the plums with the hot raspberry jam, and dust with confectioners sugar.

Serve immediately with a big dollop of whipped cream.

After all this, you will probably want to take a nap. I did, and it was glorious. Heres hoping your first fall meals warm up your kitchens and your stomachs.

Friday, October 16, 2009

Hello Fall...or Winter?


We seem to have skipped fall completely here in Chicago and other parts of the Midwest. It has been about 20 degrees under the normal high temperatures, but looking on the bright side, at least it hasn't snowed yet like is has up in the northern regions.

I wanted to kick off fall with a big meal that would fill us up and warm the apartment. I accomplished both of those goals, and also made my boyfriend and his friends very happy campers, with very happy tummies.

We feasted on a whole roasted chicken with lemon, thyme, bacon, and garlic, mashed potatoes, pear and goat cheese salad, roasted root vegetables, and popovers. This was all finished off with a warm plum and raspberry tart.

I think of this as my dry run for the thanksgiving feast myself and some of my friends are going to have here in Chicago the weekend before the actual holiday. Everything went really smoothly, and even mistakes that were made turned out to be good things.

The day after this meal, in my food coma hangover, I realized that I roasted the chicken upside down. The funny thing is that I have seen so many birds roasted on television shows and in person that I can't believe I was confused when the recipe told me to 'tuck the wings underneath the bird'. I thought to myself, 'but the wings are already underneath the bird...'.

It turns out that this was a great mistake. The breasts were impossibly tender and juicy and I think that may have been because they basically braised in their own juices, bacon drippings, and lemon juice for about 2 hours. I think I may just flip my turkey upside down come Thanksgiving, but next time it will be on purpose.

Pear and Goat Cheese Salad with Balsamic Vinaigrette

This is a VERY simple salad, but a classic and tasty combination of tart cheese and mellow fruit. Just be sure to use a high quality balsamic vinegar for the dressing.

1 package of baby spring greens
1 pear, diced and tossed with lemon juice to prevent browning
4 ounces crumbled goat cheese
3/4 cup olive oil
1/4 cup balsamic vinegar
salt and pepper to taste

Combine olive oil, balsamic vinegar, salt, and pepper in a tightly sealed container and shake vigorously until oil and vinegar is combined and emulsified. Toss greens, pears, goat cheese with just enough dressing to coat.

Lemon and Garlic Roast Chicken
Recipe from Ina Garten - on foodnetwork.com
my notes in green

1 5-6 pound roasting chicken - I used a slightly larger one - about 8.5 pounds - so I would have plenty of leftovers, although I think the boys devoured much more of it than I anticipated
Kosher salt
Freshly ground black pepper
1 large bunch fresh thyme
4 lemons
3 heads garlic, cut in half crosswise
2 tablespoons butter
1/2 lb bacon - don't use lean bacon here, the point of it is to basically self-baste the chicken with the bacon fat
1 cup white wine
1/2 cup chicken stock

Preheat your oven to 425 degrees.

Remove chicken giblets - if you are lucky they are in a nice little packet, if you aren't so lucky, you may have to pick them out one by one. I threw these into the freezer for a later date, you can make gravy and stock with these goodies. Rinse the chicken inside and out, and pat dry with paper towels. Place the chicken in a large roasting pan and liberally salt and pepper the inside cavity - I do not have a large roasting pan yet, so I used my 13 inch All-Clad french skillet and it worked great, it was just a bit harder to get it in and out of my oven.

Stuff the chicken with most of the thyme - I saved some for the roasted veggies - 1 lemon, halved, and two halves of the garlic. Now Ina calls for tying the legs together with kitchen twine and tucking the wing tips under the body. Since I roasted my bird upside down I did not need to do either of these things. If you want to go more conventional and roast your chicken right side up, by all means get the kitchen twine out and tuck those wings.

Quarter the remaining lemons and scatter them along with the rest of the garlic around the chicken in the bottom of the pan. Lay the bacon slices on top of the entire chicken - again I am sure this would be more effective had I roasted the chicken right side up, with the bacon fat flavoring the breast meat and keeping them moist. Next time I will either roast the chicken upside down again but omit the bacon, or roast it right side up with the bacon but definitely not a combination of the two.

Roast the chicken for 1 hour. Remove the bacon and set aside.

Roast for an additional 30 minutes or until the juices run clear when you cut between the leg and thigh, or the breast temperature reaches 165 degrees - mine was bigger and took about an hour and 50 minutes total roasting time.

Remove to a platter, cover with foil, and let rest for up to 30 minutes.

For the gravy, remove all but 2 tablespoons of fat from the bottom of the pan. Add the wine and chicken stock and bring to a boil. reduce it to a simmer, and cook until reduced by half, about 5 minutes - I added a bit of cornstarch to help thicken it up since it was pretty runny.

Mashed Potatoes with Bacon

4-5 pounds Yukon gold potatoes
2 bay leaves
Kosher salt and freshly ground black pepper
1 cup heavy cream
4 tablespoons unsalted butter
Reserved bacon from roast chicken - roughly chopped

Peel and quarter potatoes and place in large pot of salted cold water with bay leaves. Bring to a boil then cook until fork tender, about 30 minutes. Heat the butter and cream over low heat in a small saucepan. Drain the potatoes and put back into the pot with the cream and the butter. Mash with a potato masher or a large fork until creamy and smooth. Season to taste with salt and pepper. Top with chopped bacon.

YUM. And we aren't even done yet. Since this post is starting to become a novel, I will leave the other sides (the roasted veggies and popovers) and the dessert for the next post so I don't lose readers due to sheer boredom. Maybe it will have turned back into fall by then, who knows.

Sunday, October 11, 2009

Pre and Post


Recently I enjoyed a fabulous meal with my wonderful friends up in Minnesota. There were appetizers by Heather, an amazing salad by Jen, mustard-coated pork tenderloin, caramelized onions and green beans, and roasted potatoes by Stefanie, and a gluten-free white peach galette by yours truly. Oh yes, and lots of wine. It was a definite group effort for this dinner but somehow I only managed to get pictures of the pre-dinner and post dinner eats, and I blame it on all that wine. I did get one picture of the beautiful potatoes, but only because one of the strawberries jumped ship while under the broiler.

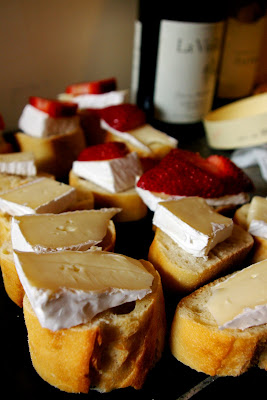
Heather provided a simple and tasty appetizer that included french bread, brie cheese, and fresh strawberries. These tidy little stacks were slid under the broiler for a few minutes, where they turned into hot and molten morsels.

Dessert was my job, and yes once again I went for a gluten free adaptation for Miss Jeni. After a lovely trip to the Minneapolis farmer's market, I found myself with some gorgeous white peaches, and a bag of golden raspberries. I wanted something simple that would showcase these late summer beauties. I opted for a galette, with is simply a free-form tart. You roll out a big circle of what is essentially pie dough, put your fillings in, and fold up the edges to hold it all in.

The galette was tasty, but it didn't hold together very well at all, and I am sure that was do to my improvised crust. I found a pie dough recipe and substituted gluten-free baking mix and almond flour in for all purpose flour. Next time I think I would eliminate the almond flour from the dough, and just use more almond flavor in the filling.

For the filling, I sliced the peaches really thin and laid them in concentric circles on the disk of dough. I cooked the golden raspberries down with some sugar, gelatin, and some limoncello to make a sort of jam. It was a bit of a random combination, but that's what's great about relying on my parents well stocked pantry instead of using a recipe. You never know what fun things you will find in there. I brushed this mixture over the peaches, folded up the dough and sprinkled with white sugar and sliced almonds.

Served with fresh whipped cream, it was a good ending to a sublime evening (okay that's a lie, the evening ended with us drinking beer at Williams Pub, but it was the ending to a great meal anyway).

Crust

3/4 cup gluten-free baking mix
1/2 cup almond flour
2 tablespoons granulated sugar
1/4 teaspoon salt
1/2 cup (1 stick) unsalted butter, chilled and cut into small pieces
3 to 4 tablespoons ice-cold water

Add baking mix, almond flour, sugar, and salt to food processor and pulse a few times to combine. Add cold butter and pulse until butter has been cut into pea-sized chunks. Add water one tablespoon at a time and pulse until dough forms a rough ball. Turn out dough onto floured surface, gently form into a disc, cover it with plastic wrap and let rest in the refrigerator for 1-2 hours.

Golden Raspberry "Jam"

1 cup golden raspberries
3/4 cup sugar
1 tablespoon gelatin, dissolved in 1 tablespoon water
a few tablespoons of Limoncello, or other citrus liqueur

Combine all ingredients into a small saucepan, and simmer over very low heat for about 20-30 minutes, until berries break down, and sauce thickens.

Galette

1 chilled pie dough
golden raspberry 'jam'
2-3 white peaches, skin and pits removed, halved and thinly sliced
1 egg, beaten
sugar and sliced almonds to garnish

Preheat oven to 400 degrees.

On a floured surface, roll out dough to form a large circle about 13 inches in diameter. Place dough on a parchment paper or sil-pat lined baking sheet. Arrange peach slices in concentric circles, leaving at least a 3 inch border of dough. Brush 'jam' on top of the peaches. Fold the edges of the dough up over the filling. The great thing about this kind of tart, is that it is supposed to look rustic. So don't worry if it looks bad now, it will most likely look beautiful when it comes out of the oven.

Lightly brush the top of the dough with the beaten egg, and while it is still wet, sprinkle crust with sugar and almonds.

Bake at 400 degrees for about 40 minutes until golden brown. Serve with fresh whipped cream.

There are definitely more riffs on this classic tart in my future. I can't wait to try it with regular pie crust, and all kinds of fillings, and oh yes, there WILL be ice cream involved.

Tuesday, October 6, 2009

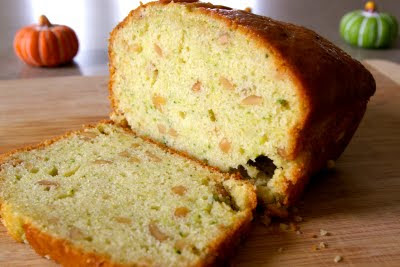
Cashew - Zucchini Bread

Fall is starting to settle in. I know that mostly because I spent most of my three day weekend cooking and baking. To me there is nothing better on a chilly Saturday afternoon than to listen to A Prairie Home Companion on NPR, pour myself a glass of wine, and cook something delicious.

One of my recent cooking goals has been to utilize all the cookbooks I have and the magazines I am subscribed to more often. I usually go straight for the Internet, whether it be Food Network or Epicurious, but I have so many untapped resources at my disposal, I felt like I was wasting them.

So this weekend I went into the latest issue of Food & Wine Magazine with a mission, and found a yummy looking zucchini-yogurt bread recipe. I happened to have a zucchini in the fridge and some leftover plain yogurt from curry night last week. I realized I had every single ingredient except for the walnuts that it called for. Since I really did not want to go to the store and spend 7 bucks on a tub of walnuts, I took a gander into my pantry. Lo and behold, I had almost an entire jar of cashews. Ah, a sigh of relief. A nut substitution never hurt anything. Plus reading a recipe and knowing you have such a well stocked pantry that you don't have to brave the rain and cold weather to run to the store, is an AMAZING feeling. Trust me on this.

So here it is:

Cashew-Yogurt-Zucchini Bread
adapted (barely) from Food & Wine Magazine

Makes one 9-inch loaf, this would probably be enough batter for 12 muffins, but I haven't attempted that yet. If anyone tries it that way, please let me know how it turned out!

1 cup cashews - coarsely chopped
2 cups all-purpose flour
1 medium zucchini, coarsely grated (about 1 cup)
1/2 teaspoon baking powder
1/2 teaspoon baking soda
1/2 teaspoon salt
3/4 cup plus 2 tablespoons sugar
2 large eggs
1/2 cup vegetable oil
1/2 cup plain yogurt

Preheat oven to 325 degrees.

Butter and flour a 9 X 5 loaf pan. (do this very well, when I turned my loaf out to cool, the bottom stuck a little and only the top half came out. Luckily, it was still really really hot. I quickly stuck them back together and they seemed to almost bake back into a cohesive loaf).

In a large bowl, whisk together the flour, the baking powder, the baking soda, and the salt.
In another bowl, whisk together the eggs, sugar, vegetable oil, and yogurt.

Add the wet ingredients to the dry and whisk lightly just until incorporated. Add the grated zucchini and cashews, and mix until evenly dispersed.

Pour batter into loaf pan, and bake for about 1 hour and 15 minutes. Mine ended up taking about an hour and a half, just make sure to do the toothpick test. I use bamboo skewers since they are really long, and I have less chance of burning myself. Stick a skewer or toothpick into the center of the loaf, and if it comes out clean, it is done.

Let the bread rest in the pan on a rack for at least 30 minutes before trying to take it out of the pan. This was my mistake, I got impatient, it just smelled so good.

This bread was really good, if not a bit bland. I suppose that's what you get for making a semi-healthy quick bread, with no butter and just a small amount of sugar. Next time I would probably add a citrus component, maybe some lemon or orange zest to give it that little extra something. It was great with some butter or homemade jam spread on top.


Goodbye Summer...

Well it looks like fall is here to stay. As much as I love the season, I just am not ready for it this year. I feel like summer was here for about two weeks and then the leaves started changing. Oh well, hopefully there is still time to get one last camping trip in before the snow comes.

I figure this is the time to showcase what was probably some of the best 'summer food' I had this year. I can take no credit, for it was served to me by my parents while I was home mooching off of them after I got laid-off. Juicy Lucy Hamburgers, Grilled Deconstructed Caesar Salad, and Tomato, Basil, and Feta Salad, will forever be in my brain when I think of waning days of warm weather. The wonderfully fresh ingredients straight from the farmers market, the grill smoking in the back yard, and a bottle of wine (or three) with the people I love; what a great way to wrap up the summer.

This bottle in particular was the last of the bottles brought home from our trip to Italy.

Since my parents hold these recipes, and I had no part in cooking them (I don't even know what was in half of them) I will simply do my best to describe the photos. All three of these dishes are pretty basic actually, made from simple fresh ingredients, combined to make something exceptional. I wont give away their secrets, you can look for the recipes someday in the Helgerson/Boynton Cookbook, coming to a store near you (you guys almost done with that??).

Juicy Lucys

Basically a Juicy Lucy is a hamburger STUFFED with cheeses of your choosing (and I mean stuffed, I think mom put 3 or 4 kinds of cheeses inside). This is thrown on the grill and stacked high with fresh tomatoes, lettuce, ketchup, mustard, mayo, and whatever else floats your boat.

This was easily one of the best hamburgers I have ever had, and my god was it HUGE. Look at the cheese oozing out of the center. It's hard to look away right?


Tomato, Feta, and Basil Salad

I am just starting to be able to eat raw tomatoes. I was a very picky child, and as I am getting older and getting into cooking, I have been choosing various foods that I didn't really like growing up, and then working towards enjoying them, and eventually loving them. I am definitely well on my way to loving raw tomatoes, and this salad was a key player in that process. A mixture of yellow heirloom tomatoes from my uncle in southern Minnesota, and some gorgeous red heirloom tomatoes that are thriving in pots out on the driveway at my parents house, some fresh basil, herbed feta, olive oil, and balsamic vinegar.

Summer perfection.

Deconstructed Grilled Caesar Salad

This is probably my favorite salad of all time. Yes it is that good. Last time I asked my Dad for the Caesar dressing recipe, he just gave me a list of ingredients, no measurements whatsoever. A little trial and error was needed, but if you have never tried homemade Caesar dressing before do it now. Please, you will thank me later. Mayonnaise, crushed garlic, smushed anchovy (yes that is the correct culinary term), lemon juice, Dijon mustard, Worcestershire, white wine vinegar, and cracked black pepper. That's all it takes to have the most heavenly Caesar dressing you have ever tasted.

To elevate this salad even more, the heads of romaine are left intact, sliced in half, brushed with olive oil and grilled just for a minute to char the outside, while leaving the innards cool and crisp.

Instead of croutons, there is grilled garlic bread.


Last but not least, for the brave eaters: a whole anchovy splayed on top. Add a little (or a lot) of freshly grated Parmiginao Reggiano and I think you'll find that deconstructionism never tasted so good.

Hope your end of summer eating was as enjoyable as mine. Time to get out the pumpkin lights. :-)

Pin It

LinkWithin

Related Posts with Thumbnails