Wednesday, October 9, 2013

A Jump on Autumn


One bonus of working in a professional kitchen, is that I get to have a jump on the seasons. I get a head start on fall baking in early September, start playing around with winter spices in November, and experiment with bright winter citrus in December. We are rolling out a new fall inspired menu at the restaurant in the next week and I could not be more excited. Does this early run on autumnal goodies mean I will hit burn out on fall flavors by November?

Fall is my favorite season, and the food that comes with it is second to none. Even better than fall baking, is fall cooking, and while I am up to my ears in cinnamon, pumpkin and apples at work, at home I am diving head first into slow braised meats, stews and soups, and some serious comfort food. This week I made my first big 'ol pot of chili of the year. Chock full of hearty ingredients, warm spices, and healthy lean ground turkey, this is one soup to keep on rotation. Roasted sweet potatoes, black beluga lentils, white cannelini beans, crunchy corn and yellow bell peppers all add to the complexity and texture. Cumin, coriander, ginger, smoked chipotle chili powder add to the depth of flavor and slow subtle heat. If you are looking to change up your usual chili recipe, this is it.


Autumn Chili with Beluga Lentils, Roasted Sweet Potatoes, and Turkey

2-3 lbs ground turkey,
3 teaspoons paprika
1/4 cup AP flour 
1/2 cup olive oil 
1 large vidalia onion, chopped into 1/2 inch pieces
6 garlic cloves, minced
1 large green jalepeno, diced (remove seeds if you want it a little less spicy)
1/4 cup tomato paste
4 tablespoons chili powder
2 tablespoons smoked chipotle chili powder
2 teaspoons ground cumin
2 teaspoons ground coriander
2 teaspoons ground ginger
1 28-ounce can crushed tomatos
2 cups white wine
8 cups chicken stock
4 medium sweet potatoes, peeled and diced small
2 cans canellini beans
2 cups black beluga lentils
2 small cans corn
2 bell peppers (red, yellow or orange are my preference), diced
1/2 cup parsley leaves, minced
greek yogurt and more chopped parsley to garnish
salt and pepper to taste

Preheat oven to 400 degrees F. Toss diced sweet potatoes with 1/4 cup olive oil and season generously with salt and pepper. Roast for 30-40 minutes, tossing periodically until starting to caramelize. Set aside. 

Meanwhile, heat enough olive oil to coat the bottom of a large heavy bottom pot, such as a dutch oven, over medium-high heat. When oil is hot, add turkey and cook until cooked through and starting to brown. Add the onions and garlic and cook until softened and starting to caramelize, about 5-7 minutes. Sprinkle the flour over the turkey and cook for a minute or two, stirring constantly to cook off a bit of the raw flour taste. Add the jalepenos and saute another 2-3 minutes, until softened.

Add the tomato paste, chili powders, cumin, coriander, ginger, and stir to combine. Add the wine, bring to a simmer, then add the chicken stock and tomatoes. Stir to combine, then bring to a boil and add the lentils. Reduce heat, and simmer for 30-45 minutes, until lentils are starting to get tender.

Add the beans, corn, bell peppers, and sweet potatoes. Bring back to a boil and simmer for 15-20 minutes, until veggies are tender. Stir in parsley and serve immediately topped with greek yogurt and more parsley. This also freezes wonderfully.

Saturday, October 5, 2013

Good as Gold


It's Saturday morning, and I am at home, drinking coffee, and...well, that's it actually. I am sitting in my pj-s, doing nothing. Nothing except writing this post. It feels wonderfully weird. No baking to do, no projects to work on, nothing. I get to spend some time with friends today whom I haven't seen in far too long, participate in some fall-themed activities, and share with you some goodies that I just haven't had the time to post.

A few years ago, I hinted not-so subtly on this very blog that I wanted Santa to bring me an airbrush machine for christmas. Santa pulled through, but unfortunately the machine was swiftly delegated to our second bedroom, otherwise known as the room where kitchen appliances go to die. When a friend of mine asked me to make her a anniversary cake, and showed me the picture of what she had actually wanted her wedding cake to look like (not what they ended up receiving unfortunately). I knew this was a perfect opportunity to resurrect and make use of my not-so new toy.


A smooth layer of buttercream, a quick coat of airbrush gold, and a light pressing of a textured paper towel, gave this cake it's antiqued look. For the flower, I rolled what felt like a million little balls out of fondant in multiple sizes and used royal icing to secure them to the center of the flower. Then I airbrushed the entire center and let it dry before affixing the petals.


Inside is my favorite devils food chocolate cake, frosted with vanilla italian meringue buttercream and filled with this raspberry curd mousse.

Raspberry Curd Mousse
recipe adapted from epicurious.com

12 oz raspberries
1 1/4 cup sugar
2 eggs
2 TBL lemon juice
2 TBL unsalted butter (room temperature)
pinch salt
1 tsp gelatin
1 TBL water
1 cup heavy whipping cream

Combine raspberries, sugar, lemon juice, and butter in a food processor, and pulse until raspberries have broken down. Transfer to a saucepan, and whisk in the eggs and salt. Place pan over medium heat, and bring mixture to 175 degrees F, whisking constantly. Remove from heat, strain through a fine mesh sieve, and let cool to room temperature, whisking every few minutes to aid cooling. Combine water and gelatin and let bloom for 5 minutes. Melt gelatin and whisk into raspberry curd. When mixture has cooled to room temperature, whip the heavy cream to medium peaks. Add the raspberry curd and mix until combined. Chill until you are ready to fill your cake.

You can skip the gelatin if you want, but I found the raspberry curd to be a little runny to be filling layer cakes with. If you are using the curd or mousse for a different purpose you can omit it.

Tuesday, September 17, 2013

Checking In


If I have been reminded of anything this summer, it is that life is short. Too short. The life you've grown accustomed to, your sense of comfort and control, and even the ones you love can be snapped away in a mere second. The months fly by without you noticing, or having the time to stop and realize what you are missing.


I found that I sort of checked out of life this summer. I checked out of social activities, checked out of taking care of myself, checked out of a lot of things. I threw myself into work and grief, and neglected most of everything else.


Now I find the weather beginning to cool off, there are pumpkins for sale at the garden store down the street, and I am wondering where the season went. I am also wondering what the hell was wrong with me?


My wake up call came in the form of a much needed celebration to close the summer. I have been home so many times these past few months, a few times to say goodbye to lives cut too short, but most recently a visit home for a wedding was the giant breath of fresh air that many in my family needed to come together and celebrate love and new beginnings.


Weddings have a way of doing that I think. It reminds you of how much love there is in this world. You can look around, and see all eyes and hearts focused on the two people in the front of the room, supporting them and wishing them a life full of happiness. In this case, the wedding was my sister's (which will have it's own post altogether) and there were just so many faces that I had a chance to catch up with and reconnect with. I also was scolded by more than a handful of family friends and relatives that I had not updated this space in a long time, so friends, this is for you.


I feel honored every time I am trusted to make a wedding cake. It is a big job, and often it is the first thing guests see when they walk into the reception space. It is a constant reminder of why I do what I do. I am in the business of making people happy, and to see the joy on someone's face when they catch the first glimpse of their wedding cake, or when dessert is placed in front of them at the end of their meal, is my motivation to keep creating.


When life hands us a little more than we can handle, it's easy to check out. The better path though, is to check back in, keep getting better at your job, strengthen your relationships, tighten up your family ties. Life may keep you busy and overwhelmed but at the end of the day, what is left is family, love, and passion, things that should never be taken for granted.

Wednesday, June 26, 2013

Buttercream Beauties


I think its safe to say buttercream is BACK. Not that it ever went away completely, but after years (decades even?) of playing second string to fondant, buttercream-covered wedding cakes are making a comeback.


Maybe its the blossoming culture of relaxed bridal "rules", or the trend of rustic-chic wedding decor, or it could be valuing taste over perfection, but more and more brides are eschewing fondant for the cake of their dreams.


I have a few opinions on fondant, some of them conflicting. There is a time and a place for fondant cakes. Many of these times and places happen to be weddings, but I don't see it as a necessity anymore . Once upon a time, and I was recently told this by a VERY traditional, VERY southern mother of the bride, the cake represented the 'bride', and therefore needed to be white. Pure white, inside and out. She was not very happy with the bride wanting my buttercream on the outside, and buttermilk cake on the inside, both of which are made with butter, and therefore not pure white. I explained that I do not use shortening or imitation vanilla extract which results in my frosting being a very slightly off white, but that the flavor and texture is unbeatable. For my cakes, if you want pure white, it has to be fondant, I simply will not compromise the quality of my ingredients for color.


If your primary goal with the cake is design, and tying it perfectly into the theme or color scheme of your event, then fondant may be the obvious way to go. On the other hand, I would say 90% of people end up peeling it off before consumption, or just eating around it. It truly is for aesthetic purposes only, albeit an edible one. Don't get me wrong, I love making edible artworks with fondant, but sometimes, buttercream is best.


Sometimes, simplicity makes for a stunning cake on its own, without all the adornment of details and adornments. These two cakes were my first of many this wedding season and I think they kicked it off with a great start. More to come, so stay tuned.


Monday, May 13, 2013

Easy Does It


There are things in life that just work. The perfect cup of coffee, weekly brunch dates, long bike rides on the first warm day in the spring,  pajamas and reruns. Routines, traditions, patterns.

There are also thing in life that you have to work at; friendships from afar, love on opposite schedules, family ties being stretched thin, career in constant adaptation and change. They need effort, they need attention, they just need more of myself than I have been giving them. As my career is taking up so much of my time, sometimes I feel that the other areas of my life suffer. They get neglected, pushed aside. Just until tomorrow, I tell myself.


This concept of 'tomorrow' finally materialized. I was able to fly home for a short 48 hours to try to pack in as much as I could. And pack it in I did, by meeting new babies, spending some girl time with my sister and mom, sharing meals and wine with my dad and soon to be brother-in law. So many sentimental and rather emotional activities in such a short period of time left me kind of a mess, exhausted and a bit emotional myself. But I would do it again in a second, because you know what? It works. I just don't have the time off or the money to travel home that often, so when I get the chance I make it work, no matter how short the visit, or sad the goodbyes.


When I get a bit of time to myself, sometimes I can let my brain overload on all the possibilities of things to do, new recipes to try, and crazy projects in the kitchen. Lately though, I have been focusing on easy, simple, and classic. A disc of leftover pate brisee hanging out in the freezer, some berries on sale at the grocery store, and just enough eggs left in the fridge to make pastry cream, it just came together without much effort. For those few hours alone with my coffee that morning, it was the perfect thing to keep my hands busy and let my mind wander. Its something that doesn't happen as often as it should these days, plus pastry cream with fresh berries is just one of those things that works. Always has, always will.


Pate Brisee Crust
(this is enough for 16-20 3-inch tarts)

400 grams (14 oz) unsalted butter, chilled, cut into 1/2 inch cubes
1 tablespoon white distilled vinegar
100 grams (3 1/2 oz) granulated sugar
2/3 cup water, chilled
665 grams (1 lb 7 1/2 oz) all purpose flour
1 teaspoon salt

Remove butter from fridge 20 minutes before mixing.

In a small bowl, combine sugar, water, and vinegar, stir to aid the dissolving of the sugar. Set aside in refrigerator for 10 minutes. Then, stir again to completely dissolve sugar.

In a food processor, pulse the flour and salt together a few times to combine. Add the butter, and pulse in one second bursts about 3-4 times until butter is cut in and evenly dispersed. You should have visible chunks of butter in your flour mixture, this is where the flakiness comes from.

Pour mixture into a large bowl and make a little well in the middle of the flour. Pour the vinegar water mixture into the well, along with the almond extract, and gently mix liquids into the flour with a fork. When liquid is evenly dispersed, dump dough out onto a clean surface and knead gently a few times, just until dough comes together in one cohesive ball. It may be a bit shaggy or falling apart, but that's okay, while it is resting the moisture will bind everything together.

Cut ball of dough in half and shape each half into a disc about 1/2 - 3/4 inch thick. Wrap in plastic wrap and chill for at least two hours, or overnight. Take dough out of fridge about 15 minutes before you roll it out. For the 3-inch sized tarts, I cut each disc in half, rolled it out into a square, 1/8 inch thick, then cut the disc into four pieces, placing each one of the four pieces in a tart mold. How you roll the dough out will depend on the size and shape of the tart mold you are using. Always start in the center of the disc and roll outward, turning the disc 30 degrees after each roll to get an even thickness throughout. Carefully move the dough to your tart pan and press evenly into all corners, pinching off the excess.

Dock with a fork (meaning poke a bunch of tiny holes in the bottom of the tart crust with a fork) and freeze for twenty minutes. Preheat your oven to 400 F. Place a piece of tin foil over your tart shell, pressing it down to fit the form of your tart, and fill with beans or rice or pie weights. Blind bake your tart for 15 minutes, flipping the pan front to back halfway through. Remove the pie weights and tin foil and bake for another 5-7 minutes, until the crust is golden brown (the times on this will depend again on the size of your tart pans) . Let cool completely.

Orange Vanilla Bean Pastry Cream
(makes enough for 16 3-inch tarts)

1 cup milk
1 cup heavy cream
1/4 cup cornstarch
2 eggs
4 egg yolks
1/2 cup sugar
2 oz butter, chopped into small pieces
1/2 vanilla bean
zest of 1 orange

In a medium sized sauce pan, heat the milk, 1/2 cup of the cream, and the vanilla bean pod, split and scraped. Bring to a boil, remove from heat, cover and let steep for about 20 minutes. Strain through a fine mesh seive, then return to burner. Add the sugar and bring to a boil. While mixture is heating, combine the eggs, yolks, cornstarch, and the remaining 1/2 cup of heavy cream in a medium bowl. Whisk until smooth.

When the cream/sugar mixture reaches a simmer and the sugar is completely dissolved, temper into the egg mixture,  whisking constantly. Return the mixture to the saucepan, and cook over medium-low heat, whisking constantly, until it thickens.

Since it has cornstarch in it, it does technically need to come to a boil for it to thicken properly, so once that first bubble pops, remove from heat and immediately put through a fine sieve to ensure that no scrambled eggs make their way into your pastry cream. Whisk in butter and orange zest and chill about 4 hours or overnight before using.

Tarts - Assembly

Pipe the pastry cream into each of your tart shells, using just enough to cover the bottom. Arrange blackberries on the surface of the pastry cream and top with chopped pistachios, and more orange zest. These are best eaten within a few hours, if you are making them much ahead of time, I would spread a thin layer of apricot jam onto the pastry crust before filling to keep the shell from getting soggy.


Monday, February 11, 2013

Owl Love You Forever


Inspiration can come from anywhere. Seriously, ANYWHERE. Wallpaper, pillows, coffee mugs, paintings, buildings, even kleenex boxes. Yep, you read that right. A silly painted kleenex box was the inspiration for this wedding cake.


I had been trying to shake what is either a cold or winter allergies and have gone through an absolutely insane amount of kleenex in the past three weeks. There was one box I just couldn't throw away. These owls were mesmerizing. I knew I wanted to do something with them, but couldn't figure out what.


I had been wanting to try watercolor-style painting on fondant for a while now and these cute little owls gave me the perfect subject. As it turns out, it was much easier than I thought it would be. First, I cut my shapes out, let them dry overnight. Then I just mixed some gel food coloring (you only need a very small amount) with a splash of vodka. From there, you can paint just as you would with real paint. The thinner you make the food coloring, the lighter the color will be, just like watercolors. Again, I let my shapes dry overnight, then punched the outline out with some jet black royal icing.


Who says you need a traditional all white wedding cake with flowers and bows? Not that there is anything wrong with that, but in the days of pinterest and zillions of wedding blogs, its never been easier to get a little creative with your wedding day. Plus why would you pass up the opportunity to say owl love you forever all day?


Happy Valentine's day to you and yours.

Wednesday, January 30, 2013

Tea Time


The pace is starting to pick up again. After a nice, calm, rather slow January, it's time for the madness to begin once again.

I am not talking about basketball. The group of restaurants that I run the pastry programs for, is set to open their fifth location this March. Not only is it a very large restaurant, it is smack dab in the middle of the tourist strip downtown Chicago. The dessert menu has been set, hiring has begun, and change is coming. I have a feeling there is going to be a bit of shell shock that comes along with this opening. Going from a 200 seat beer-centric gastropub in old town, to a 600-seat restaurant on Michigan Avenue, open for lunch and dinner seven days a week, is going to be a bit of an adjustment.


It's time to buckle down, get organized, and let this tornado do with me what it will. Last year at restaurant opening time, I was completely green, never having working in a restaurant kitchen before. I was basically like a deer in headlights, with an apron and a spatula. Within the span of about two weeks, I went from being hired, to helping design the dessert menu, to cranking out my sweets for the masses. What a whirlwind it was.

Thankfully, this year is a bit different. I have had time to think, and carefully plan the menu. No near-nervous breakdowns, no all-nighters, no second-guessing my decision to accept a job as a pastry chef a few months out of school.

The main difference this time around is that I have experience in my back pocket. It may only be a year, but I have learned so much about production, cost, and more importantly, the clientele. I know a little bit more about what sells, and what kinds of things will make people buy dessert, and what makes them choose one menu item over another. I am so much more confident in the menu this year, and am so excited to get started. I can tell you there is bacon and lots of booze on the dessert list, and that can't be a bad thing.


So, while I am patiently waiting for things to kick up a notch, I am taking some time to just relax a bit. I have to drink in the moments of stillness, that by April, will feel like a distant memory. Here we go again.

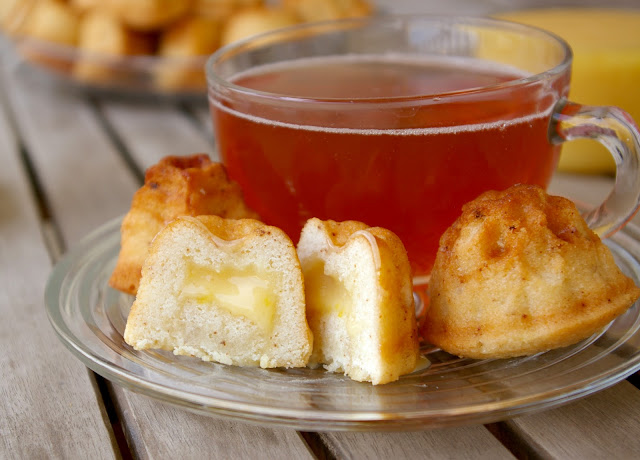
Here in the midst of winter, citrus fruits are at their finest, and what better way to preserve their glory than turning them into curds. Forget lemon curd, that's boring, how about blood orange, meyer lemon, or even better, grapefruit? Pair the tangy, tart curd with some delicate almond financiers, and you will have a great excuse to put on a pot of tea, kick back and take a few minutes out of your busy day to just relax.


Almond Financiers with Grapefruit Curd 
adapted from Bon Apetit and Ina Garten

Almond cakes:

2 tablespoons unsalted butter, melted
1 cup almond meal
1 2/3 cups confectioners sugar
1/2 cup all purpose flour
1/8 tsp salt
3/4 cup egg whites
3/4 cup unsalted butter, melted and cooled

Preheat oven to 450 degrees F. Using the 2 tablespoons of melted butter, lightly grease your financier tins, or miniature bundt cake pan. Place pan in freezer to let butter solidify.

In a large bowl, mix together the almond meal, sugar, flour, and salt. Add the egg whites and stir with a rubber spatula until just combined. Add the melted butter, and mix to combine. Spoon the batter into molds, filling 3/4 the way full.

Bake the cakes for about 5 minutes (if using a miniature bundt pan, about 7 minutes if using traditional financier molds). Turn oven temperature down to 400, and bake for an additional 5 minutes (7 minutes for financier molds). Turn oven off completely and let the pan sit in the oven for another 5 minutes (7 for finanicers). Remove cakes from oven, and let cool completely before unmolding.

Grapefruit Curd:

zest of 1 grapefruit
zest of 1 lemon
1 1/2 cups sugar
4 oz unsalted butter, softened
4 eggs
6 tbl grapefruit juice
2 tbl lemon juice
pinch of salt

In a medium sized sauce pan, off heat, whisk together the sugar, zest and softened butter until it creates a paste. Whisk in the eggs one at a time, then add the juices and salt. Place saucepan over medium-low heat and whisk constantly until mixture reaches 170 degrees.

Transfer to a bowl and place a piece of plastic wrap directly on the curd to prevent a skin from forming. Refrigerate for a few hours, or overnight to firm up.

To Finish:

Using a apple corer or large pastry tip poke a hole in the bottom of each financier. Remove the 'core', reserving. Remove a bit of cake from each core to make room for more curd. Pipe a small amount of curd into the financier, and replace the core back into the bottom.  This process is similar to filling cupcakes, just upside down. Serve immediately, or freeze for future use.

Saturday, January 12, 2013

Brussels Sprout Panzanella


If these pictures are conjuring thoughts of summer, I don't blame you. It was almost 60 degrees today here in Chicago. In the middle of January. 60 degrees. In January. In Chicago. Ugh.

As I stood outside in my t-shirt taking pictures, I almost convinced myself that I was enjoying the warm streak of days we've been having. Unfortunately cold reality hit me as soon as I went back inside and was confronted with the sight of my sad, shriveled up christmas tree. Don't worry I finally took it down today, and at only the 12th of january, I think its a new record. Last year I put it off until almost february. Maybe I shouldn't have admitted that.


I quickly remembered that I have a deep-rooted bitterness that instead of bundling up to go cross country skiing, or cozying up in a dark bar while the snowflakes fall outside, I am outside without a damn coat on (or sleeves for that matter). You can take the girl out of Minnesota...well you know the rest.


While panzanella may be a summer staple for anyone who loves a good tomato, its just not the same in the winter when tomatoes have a tendency to taste like cardboard. With a few twists, a hot pan, and some juicy cherry tomatoes, you can have a bright and healthful panzanella salad even in the dark, mind-numbingly cold month of January. Ha. I wish. 


This tomato and bread salad is winterized with roasted brussels sprouts, done Dad's way. If you have never added anchovy (or fish sauce) and red pepper flakes to your veggies before roasting, stop everything you are doing and try it now. It is that good.

Winter Brussels Sprouts Panzanella
serves 6 as a small starter salad, 4 as a larger side or main dish. You can bulk it up for a main meal with some diced chicken, or a fried egg.

4 cups brussels sprouts, trimmed, outer leaves discarded, then quartered (I started with about 4-5 cups, after they were trimmed and roasted, I had a little less than 3 cups, exact measurements in this recipe are not necessary)
20 cherry tomatoes
4 cups crusty bread, cut into bite sized cubes (I used a ciabatta bread, but french bread or sourdough would work just as well)
6 tbl extra virgin olive oil
2 tbl balsamic vinegar
1 clove garlic, finely minced
1 tsp fish sauce
1 tsp red pepper flakes
1 oz (approximately) shaved parmigiano reggiano for garnish
salt and pepper, to taste

Preheat your oven to 400 degrees F. Mix together 2 tbl olive oil, fish sauce, and red pepper flakes, and toss with brussels sprouts to coat evenly. Spread in a single layer on a baking sheet (I line mine with my silpat) and season liberally with salt and fresh ground pepper. Roast in the middle of the oven for 15-20 minutes, depending on how big your sprouts are, until tender in the middle, and crispy on the outside. Remove from oven and set aside.

In a large skillet, heat another two tablespoons of olive oil (or enough to just cover the bottom of your pan) over high heat. Add the cubed bread, and toss quickly to coat in the olive oil. Season lightly with salt and pepper. Cook over high heat, tossing frequently just until bread begins to brown and gets a bit crispy, about 4-5 minutes. Remove bread from pan and set aside.

Return pan to medium-high heat, and add a few more tablespoons of olive oil. When the oil is hot, add the garlic and saute for 1-2 minutes, just until garlic becomes fragrant. Add the tomatoes and saute for 4-5 minutes, shaking pan frequently to move tomatoes around, until the skin starts to blister and burst. Add balsamic vinegar and cook for another minute, tossing with the tomatoes.

In a large bowl, combine the brussels sprouts, bread, and tomatoes (save any tomato/balsamic juice that is in your skillet to drizzle on top later). Add any more salt and pepper if needed, and divide salad among your plates. Top with shaved cheese, and a few spoonfuls of the leftover pan jus.

Easy as that. Serve room temperature, or with the tomatoes hot, it is delicious either way. 


Pin It

LinkWithin

Related Posts with Thumbnails