Showing posts with label Winter. Show all posts

Saturday, January 12, 2013

Brussels Sprout Panzanella


If these pictures are conjuring thoughts of summer, I don't blame you. It was almost 60 degrees today here in Chicago. In the middle of January. 60 degrees. In January. In Chicago. Ugh.

As I stood outside in my t-shirt taking pictures, I almost convinced myself that I was enjoying the warm streak of days we've been having. Unfortunately cold reality hit me as soon as I went back inside and was confronted with the sight of my sad, shriveled up christmas tree. Don't worry I finally took it down today, and at only the 12th of january, I think its a new record. Last year I put it off until almost february. Maybe I shouldn't have admitted that.


I quickly remembered that I have a deep-rooted bitterness that instead of bundling up to go cross country skiing, or cozying up in a dark bar while the snowflakes fall outside, I am outside without a damn coat on (or sleeves for that matter). You can take the girl out of Minnesota...well you know the rest.


While panzanella may be a summer staple for anyone who loves a good tomato, its just not the same in the winter when tomatoes have a tendency to taste like cardboard. With a few twists, a hot pan, and some juicy cherry tomatoes, you can have a bright and healthful panzanella salad even in the dark, mind-numbingly cold month of January. Ha. I wish. 


This tomato and bread salad is winterized with roasted brussels sprouts, done Dad's way. If you have never added anchovy (or fish sauce) and red pepper flakes to your veggies before roasting, stop everything you are doing and try it now. It is that good.

Winter Brussels Sprouts Panzanella
serves 6 as a small starter salad, 4 as a larger side or main dish. You can bulk it up for a main meal with some diced chicken, or a fried egg.

4 cups brussels sprouts, trimmed, outer leaves discarded, then quartered (I started with about 4-5 cups, after they were trimmed and roasted, I had a little less than 3 cups, exact measurements in this recipe are not necessary)
20 cherry tomatoes
4 cups crusty bread, cut into bite sized cubes (I used a ciabatta bread, but french bread or sourdough would work just as well)
6 tbl extra virgin olive oil
2 tbl balsamic vinegar
1 clove garlic, finely minced
1 tsp fish sauce
1 tsp red pepper flakes
1 oz (approximately) shaved parmigiano reggiano for garnish
salt and pepper, to taste

Preheat your oven to 400 degrees F. Mix together 2 tbl olive oil, fish sauce, and red pepper flakes, and toss with brussels sprouts to coat evenly. Spread in a single layer on a baking sheet (I line mine with my silpat) and season liberally with salt and fresh ground pepper. Roast in the middle of the oven for 15-20 minutes, depending on how big your sprouts are, until tender in the middle, and crispy on the outside. Remove from oven and set aside.

In a large skillet, heat another two tablespoons of olive oil (or enough to just cover the bottom of your pan) over high heat. Add the cubed bread, and toss quickly to coat in the olive oil. Season lightly with salt and pepper. Cook over high heat, tossing frequently just until bread begins to brown and gets a bit crispy, about 4-5 minutes. Remove bread from pan and set aside.

Return pan to medium-high heat, and add a few more tablespoons of olive oil. When the oil is hot, add the garlic and saute for 1-2 minutes, just until garlic becomes fragrant. Add the tomatoes and saute for 4-5 minutes, shaking pan frequently to move tomatoes around, until the skin starts to blister and burst. Add balsamic vinegar and cook for another minute, tossing with the tomatoes.

In a large bowl, combine the brussels sprouts, bread, and tomatoes (save any tomato/balsamic juice that is in your skillet to drizzle on top later). Add any more salt and pepper if needed, and divide salad among your plates. Top with shaved cheese, and a few spoonfuls of the leftover pan jus.

Easy as that. Serve room temperature, or with the tomatoes hot, it is delicious either way. 


Monday, February 7, 2011

Thunder Snow

It's the snowpocolypse here in Chicago! We got over 18 inches of snow last week, the third highest snowfall in Chicago on record. How did the people of Chicago deal with this? By freaking out, storming the grocery stores and clearing the shelves of meat, bread, and bottled water. Come on people, you live in Second City, put on your big-girl snow pants and walk the two blocks to the grocery store if you need more food.


Luckily I was prepared for the lack of groceries in the store, with a freezer full of homemade bread. I was hoping to pick up some steak and make some beef bourguignon before the blizzard hit, but all the crazies got to the meat case first. So I subsisted on bread and cheese and salami (tough right?).

This prosciutto bread ranks up there with some of the best bread I have ever had. I mean, a little lard, a lot of prosciutto, crispy crust, chewy moist insides? It doesn't get much better than that people. I cheated a little because I was able to use the big stone ovens with automatic steam in my pastry school kitchens, which resulted in an amazing crust, and a beautiful hard cornmeal-dusted bottom. But, if you are handy you can get close to the same effect at home with a pizza stone and a spray bottle of water.


Prosciutto Bread
from Professional Baking by Wayne Gisslen

Yeast Starter:
15 oz Bread Flour
9 oz water
.03 oz fresh yeast (this is just a pinch of yeast, barely measurable)

Dough:
9 oz water
.33 oz (1/3 oz) fresh yeast
1 lb bread flour
.33 oz salt
1 oz lard, softened
3.25 oz yeast starter
5 oz. Prosciutto, diced into very small pieces
cornmeal for dusting

In a small-medium stainless steel bowl, combine the .03 oz of yeast and the 9 oz. of water and mix gently to combine. Add the 15 oz. of bread flour, and mix to combine, using your hands to gently knead in the bowl a few turns until it comes together. Dough will be dry and shaggy, but that is ok. Cover bowl tightly with plastic wrap and let sit at room temperature for 18 hours, or if you find a nice warm 80 degree spot, you can reduce that to 12 hours.

Once your starter is ready you can finish making the dough. In a large bowl, combine the .33 oz. fresh yeast with the 9 oz. water and mix to break up the yeast a bit. Add a bit of the bread flour and mix with a wooden spoon until you get a wet slurry consistency. You can now add the salt and fat. Mix to combine, if you have chunks of lard, it is okay, they will get kneaded in. Measure our just 3.25 ounces of your starter and break it up into smaller pieces and then add to your slurry. Begin adding flour a little at a time, until the dough comes together enough for you to handle it with your hands.

Turn dough out onto a floured surface, and begin kneading, adding flour as needed. You may not use all 9 ounces of your flour, but you will want to keep kneading and add flour until the dough is no longer tacky. Knead for about 8-10 minutes, until you can gently poke the ball of dough and it springs back almost completely. Gently knead in the diced prosciutto until evenly dispersed. Gather dough into a ball and cover with plastic wrap. Let dough rise for 1 hour at 80 degrees, or if your kitchen is cooler, until it has doubled in size.

Turn out dough onto a lightly floured surface, and gently press all the air out of your dough. At this point it is time to portion and scale your dough, but I chose to make this into one large loaf, which made it great for sandwiches. If you would like to make two smaller loaves, weigh your entire dough, then portion it into two equal pieces. Gather your dough into a ball, pulling the bottom into itself to create a stretched skin on the outside of your dough. Let the ball of dough rest on your counter under a bowl or a damp kitchen towel for 20-30 minutes. This will let the gluten relax and make it easier to shape.

You can either leave it in a round shape, or gently roll the edges to create more of a football shape, called a battard. Sprinkle a generous amount of cornmeal on a parchment lined baking sheet (or on a pizza peel or an upside down baking sheet if you are using a pizza stone) and let proof at 80 degrees for 1 hour, or slightly longer at a cooler temperature.

Meanwhile preheat your oven to 425 degrees F, and if using, preheat your pizza stone. When your bread is proofed, take a sharp knife and make three long slashes diagonally across the top of your loaf, about 1/4 - 1/2 inch deep. Bake until loaf is golden brown, and has reached an internal temperature of  around 200 degrees F, about 40-45 minutes. Every 5 minutes for the first 20-25 minutes of baking, quickly open the oven door and generously spray the oven around the bread with cold water. When bread is done cooking, it should feel light for its size, and sound hollow when thumped with your fist.

This is important...make sure you cool your bread on a baking rack completely. This allows air to circulate all the way around the bread and prevents your bread from getting soggy. Store in a paper bag at room temp for up to 24 hours. If you are not not using it right away, slice and freeze wrapped first in plastic, then in aluminum foil.

Thursday, January 13, 2011

Curried Squash & Wild Rice Soup


The weekend has once again come and gone, and yet again I am left with thoughts unfinished and tasks undone. My to do list has grown exponentially, and it seems that I am playing an endless game of catch up. Sunday marked the first day in weeks that my alarm clock was quiet until after the sun came up.

I suppose I could have caught up on the sleep lost over the past few weeks to racing thoughts and hard decisions, instead, I rolled myself out of bed and pulled out my Le Crueset. I flicked the burner on, and in went the turkey carcass that has been waiting in my freezer since thanksgiving, some carrots, onions, herbs, and garlic. Soon, the wonderful scent of homemade stock was filling the apartment. All I had to do was wait, so I pulled out another stock pot, and went to work peeling squash, sweet potatoes, and apples.

Soon enough, my stove was full of soups bubbling away, and my mind was perfectly clear. I was no longer worrying about the big changes about to come, or the new directions my life may be taking. I wasn't thinking about jobs and money and bills and credit cards. All I had to think about was not burning the chicken and apple sausage or over cooking the wild rice that were destined to join the roasted squash in the soup pot. I was filled with the anticipation of a new recipe working out with no kinks, and most of all filling my tummy with a wonderfully hearty and comforting soup.


This soup is chocked full of good stuff. Butternut squash, sweet potatoes, apples, and shallots, get roasted together and pureed. Then nutty wild rice is added, and topped with some chicken apple sausage. Lets not forget the warming kick from a little curry powder that really balances out the sweetness from the apple and squash. I have a few soups I tend to make over and over again, so this time I was looking for a little familiarity, but also something new.

I kept thinking about a butternut and wild rice soup from Emril Lagasse, recommended to me by my sister, but when I went to look up the recipe, it had a ton of heavy cream, and just didn't appeal to my mood at the time. So I took the notion of combining squash, sausage, and wild rice and made it my own. This was a great adaptation of a simple roasted vegetable soup, I hope you all get the chance to try it soon.


Curried Squash and Wild Rice Soup
this makes a HUGE pot of soup, feel free to halve

1 - 4 lb butternut squash, peeled, seeded, and cubed into 1 inch pieces
2 large sweet potatoes, peeled and cubed into 1/2 inch pieces
6 shallots, peeled and quartered
2 small granny smith apples, or 1 large, peeled, cored, and quartered
10-12 cups chicken stock
1 1/2 cups wild rice, cooked according to package directions
1-2 tablespoons curry powder
4 chicken-apple sausages (feel free to substitute any sort of sausage here) quartered lengthwise and diced
olive oil
salt and pepper

Preheat oven to 400 degrees F.

Toss squash, apples, shallots, and sweet potatoes with a few tablespoons olive oil, season generously with salt and pepper, and spread in an ever layer on two baking sheets. Roast for about an hour, tossing a few times, until soft and cooked through, and beginning to turn golden brown.

Transfer about 1/2 the vegetables to a food processor with 2-4 cups of chicken stock (enough to cover veggies), and puree until smooth. Transfer to stock pot, and repeat with remaining vegetables.  Stir in the cooked wild rice, and add the remaining chicken stock to desired thickness. Season with 1-2 tablespoons of curry powder, depending on how spicy you like it, and salt and pepper to taste. Bring the soup up to a very gentle simmer.

Meanwhile, heat a small amount of olive oil in a medium saute pan, and cook the sausage over medium high heat until cooked though and crispy brown on the outside. You can either stir the sausage in, I prefer to use it more as a garnish.


This soup freezes very well, so feel free to make a huge batch, it will be enough to get you through the remaining months of winter.

Tuesday, December 7, 2010

Pumpkin Mac


Thanksgiving is long gone, the Christmas decorations are up, the ground is covered in snow....and yet I am still finding random cans of pumpkin around my apartment. I am not kidding, they are everywhere. I think that as a result from the big pumpkin-shortage scare of 2009, I over compensated with my pumpkin purchasing this fall. Every time I went to the grocery store in late October and early November, I picked up a can, you know, just in case they ran out before Thanksgiving. I wonder if I am beginning to exhibit hoarding tendencies.


Luckily, after all the pumpkin pies and tarts were made, I found an even better way to use up my seemingly endless supply of extra pumpkin. Pumpkin macaroni and cheese. I have been seeing versions of this creation all over the blog-o-sphere lately, and I am so glad I tried it. It wasn't overwhelmingly pumpkin-y, but very rich and creamy with a hint of squash flavor at the end. I added some Gorgonzola and ground mustard to the mix, just to give a little extra bite to cut through the rich cheesy pumpkin sauce.


Pumpkin Macaroni and Cheese
serves 8-10

1 pound dried pasta (I prefer cavatappi or penne rigate, it holds the sauce really well)
1 quart whole milk
1 stick butter, divided
1/2 cup flour
1 15 ounce can pure pumpkin puree (DO NOT use pumpkin pie filling, not the same thing!)
8 ounces Gruyere cheese, grated
8 ounces cheddar cheese, grated
4 ounces crumbled Gorgonzola cheese
1 teaspoon ground mustard powder
1/2 teaspoon ground nutmeg
1/2 teaspoon freshly ground black pepper
1 tablespoon salt
1 1/2 cups panko bread crumbs
1/2 cup pecorino romano cheese, grated

Bring a large pot of salted water to a boil, and cooked the pasta until just al dente. It should still have some bite to it as it will continue to cook while baking. Drain, set aside.

Preheat oven to 375 degrees F. Meanwhile, heat the milk in a small saucepan over low heat, being careful not to let it boil or burn.

Melt 6 tablespoons of the butter in a large, heavy bottomed pot over medium-low heat. Add the flour and whisk constantly until combined and just starting to turn a light brown color, about 2-3 minutes. Slowly add in the milk, whisking until smooth and thick, about 3-5 minutes. Remove from heat and stir in the Gruyere, cheddar, and Gorgonzola cheeses, pumpkin puree, salt, pepper, nutmeg, and ground mustard.

Add the pasta and stir until pasta is evenly coated. Pour into a 10 x 14 baking dish, or alternatively you can use two slightly smaller ones. (I do this, and freeze one of the pans after baking, that way I am only tempted to eat half a pound of pasta in one sitting, rather than the entire pound.)

Melt the remaining two tablespoons of butter in the microwave, then mix with the panko and pecorino romano. Sprinkle the bread crumb mixture all over the top of the pasta and bake for 30-40 minutes, until top is golden brown and bubbly.

If anyone has any other more savory ways to use up excess pumpkin, please let me know in the comments, I think I still have a few cans lying around...

Wednesday, November 24, 2010

Home Sweet Home...and Pie


Home sweet home. I finally picked a day to drive to Minnesota that was not smack dab in the middle of a snowstorm. The past few years for Christmas and Thanksgiving, whenever i decide to make the drive, old man winter decides to throw a ridiculous snowstorm at me. I am not sure what he has against me going home, but I showed him this year. Though, it was intensely sunny and when I opened up my sunglasses case, one of the screws was missing, so I spent the entire 7 hour drive squinting into the setting sun....I can't win.


It is wonderful to be home, I am sitting in my pj's, dad cooked me truffled eggs for breakfast, we are bracing for the storm of the century, and the smells of thanksgiving dinner are beginning to waft through the house. Onions caramelizing, sage frying, homemade turkey broth bubbling, it all has me salivating for tomorrow's feast. It is just a lovely way to start the day.


Are you ready for thanksgiving? Is all your shopping done, and food prepped? The nice thing about coming home is that all I have to do is drink wine and chop/stir/plate where needed. I already had my effort-heavy thanksgiving meal last weekend, so this time around I just get to kick back and enjoy it. I was in charge of dessert last weekend, and, though most of us were too full by the time we got there, it was a tasty ending to a fun and friend-filled day.


I made this pumpkin pie from the Thanksgiving Bon Apetit Magazine, substituting my very favorite pate brisee crust. It is a beautiful twist on the plain whipped-cream topped pumpkin pie we are used to seeing around this time of year. Toasted nuts with crystallized ginger creates a pretty border and adds that crunchy extra-something to the creamy pie and buttery crust.


Pumpkin Pie with Glaze Ginger-Nut Topping
adapted from Bon Apetit Magazine

1/2 batch pate brisee (or pie crust of your choice), rolled out to 1/4 inch thick disc and chilled

Topping:

1 tablespoon butter
1/4 cup sliced almonds
1/4 cup chopped pecans
2 tablespoons pepitas
2 tablespoons brown sugar
large pinch of salt
2 tablespoons minced crystallized ginger

Filling:

1 - 15 ounce can pure pumpkin puree
1/2 cup packed brown sugar
1/2 cup sugar
1 tablespoon molasses
1 tablespoon all purpose flour
1 1/2 teaspoon ground cinnamon
3/4 teaspoon ground ginger
1/4 teaspoon ground cloves
1/4 teaspoon salt
2 large eggs + 1 large egg yolk
1 1/4 cups heavy cream

Transfer crust to a 9-inch pie pan, pressing the dough into the corners. Cut off excess dough, and crimp edges with thumbs. Freeze for 1 hour before baking.


In a large non-stick skillet, heat the butter over medium high heat. Add almonds, pecans, and pepitas and saute until nuts begin to brown slightly, just about 2 minutes. Sprinkle brown sugar and salt over and stir and cook another 2 minutes, until sugar has melted and nuts have been coated. remove from heat and stir in ginger. Set aside.


Preheat oven to 375 degrees F, with rack in center position. Line the pie crust with tin foil, and fill with pie weights, rice, or dried beans. Bake crust for 25 minutes, remove weights and tin foil, and bake for another 8 minutes. Remove crust from oven, but leave the oven on.

While the crust is blind baking, in a large bowl combine the pumpkin, both sugars, molasses, flour, cinnamon, ginger, cloves, and salt. Whisk together until combined. Add the eggs, yolk, and cream. Whisk until smooth.

Pour filling into warm crust and bake for 20 minutes. remove pie from oven, and wrap strips of foil gently around the exposed crust to prevent it from becoming too dark and/or burning. Return to oven and bake for another 40-55 minutes, depending on how deep your pie pan is. Mine is very deep so it took close to 55 minutes for middle to set. It may still jiggle a bit in the center, but if you touch the center with your finger, and it is tacky, but not liquid-y, the pie should be good to go.

Transfer to pie rack and sprinkle the nut topping around the perimeter of the filling, leaving a circle in the center exposed.

Wednesday, November 3, 2010

Greek-Style Shepard's Pie & A Giveaway!


I wish I could give away a dutch oven to each and every one of you. Seriously, I do. I love these things. To me, dutch ovens absolutely symbolize cold weather cooking. Though they are very heavy pieces of artillery, my two LeCrueset's have become an incredibly vital part of my kitchen. As soon as the weather turns brisk, my mind starts scheming to come up with new things to make in Big Red (that's what I call my 13-quart red Dutch oven, and yes I realize I am a huge nerd). 

Alas, I cannot give you a dutch oven, but I can do something to help those of you who are in need of one (or anything else in your kitchen artillery that you find you are missing). I am giving away a $45.00 gift card for CSN stores online! They have a huge selection of cookware and kitchen gadgets, and you can use this gift towards any of it. 

All you have to do is:

Leave me a comment on this post, telling me what your favorite thing to make in your dutch oven is? Or, if you don't have a dutch oven, what would be the first thing you would make if you did?

You have until next Friday, November 12th at midnight to enter. I will pick a winner at random, and you will be contacted by CSN stores to redeem your gift! 

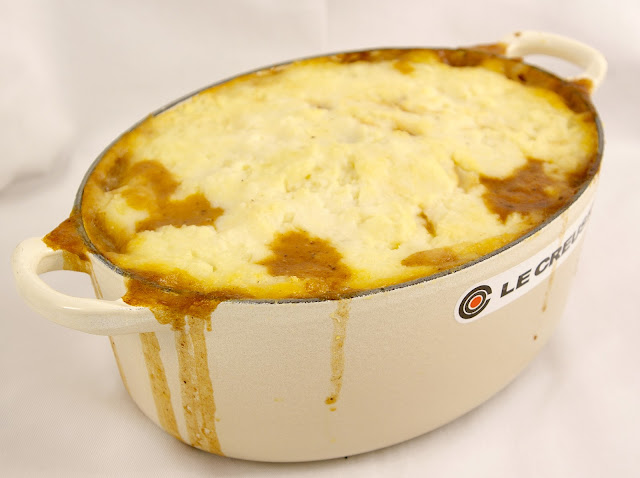
Now, lets get on to the goodies. This may not be the most beautiful or photogenic dish, and it may not be the most fancy dish, but it is so so delicious. Tender eggplant and big chunks of beef, tons of oregano and a pecorino-garlic spiked mashed potato topping...I can barely handle it. I spied this on the cover of bon appetit about two years ago, and finally got around to making it this week, I can't believe I waited this long. It is chocked full of vegetables, tender cubes of braised beef, and topped with a creamy, starchy topping, it has all the things you want out of a traditional shepard's pie, with a few twists. 

I found my favorite way to eat this particular dish is in a mug. Preferably with a snuggie on. (I almost tried to smuggle home the snuggie I got my parents as a gag-gift for Christmas) Yes, I am ashamed. You can curl up on the couch and let this pie warm your hands and your belly. 

Greek - Style Shepard's Pie
serves 8-10

1 1/2 - 2 pounds eggplant, cut into 1/2 inch cubes
coarse salt
6-7 tablespoons olive oil
2-3 pounds beef, cubed into 1 inch pieces (I usually just buy the 'stew beef', pre-cut into small square pieces)
All-purpose flour
5-6 carrots, diced
3 cups chopped onions (I used about 2 1/2 large vidalia onions)
1 cup dry white wine
1 - 28 oz can of diced tomatoes
3 cups beef broth
8 garlic cloves, minced
1 tablespoon dried oregano
2 1/2 pounds russet potatoes, peeled and chopped
2 tablespoons unsalted butter
2 tablespoons olive oil
2 garlic cloves, minced
3/4 cups whole milk
1 1/4 cups grated Pecorino Romano cheese (if you can find the Greek Kasseri cheese, use that, I couldn't find any)

Spread the eggplant on a baking sheet and sprinkle with a small handful of coarse salt. Let sit at room temperature for about 1 hour, to pull the excess moisture out of the eggplant. Rinse eggplant with water to remove salt, and pat dry with paper towels. 

Heat 3 tablespoons of olive oil in a large heavy pot over high heat. Add eggplant, and saute until tender and browned, about 12-15 minutes. Transfer to bowl, and set aside. 

Season beef with salt and pepper, then toss with enough flour to lightly coat all the pieces. Heat a few tablespoons of oil in the same large pot over medium-high heat. Working in batches, if necessary, brown meat on all sides, about 8-10 minutes for each batch. Transfer beef to a bowl, and set aside.

If pot is dry, add another tablespoon of olive oil then add the onions. Saute the onions until tender and translucent, about 10 minutes. Add the wine to the pot and scrape up all the brown bits on the bottom of the pot. Cook for about 5 minutes, until most of wine has evaporated. Add tomatoes with juice, beef broth, garlic, and oregano, and bring to a boil. Add beef with any accumulated juice and carrots to pot, and bring to a simmer. Cover and simmer over low heat for 1 hour, stirring occasionally. Uncover and simmer over low heat for another 45 minutes.

While the filling is simmering, place your potatoes in a large pot and cover with cold water. Bring to a boil and cook until potatoes are fork tender, about 15 minutes.

Preheat oven to 375 degrees F.

Meanwhile, heat the two tablespoons of butter in a small saucepan over medium heat. Add garlic and saute just a minute, until fragrant. Add milk and bring to a simmer and turn off heat.

When the potatoes are cooked through, drain and return to pot, cooking over medium heat for a few minutes until excess water has evaporated. Crush potatoes with a potato masher, and add the milk, mashing until smooth. Stir in the cheese, season with salt and pepper, and keep covered until filling is done. 

You can either bake the pie in the dutch oven the you prepared the filling in if it is oven proof, or you can transfer the filling into a 9 x 13 baking dish. Top the filling with spoonfuls of the mashed potatoes, and spread gently into a even layer to seal in the edges. 

Bake until filling is bubbling and topping is golden brown, about 45 minutes. 


Sunday, February 21, 2010

Cabernet Braised Short Ribs and Mushroom Risotto


There are some people that tie their memories to the weather, different smells, specific dates, or the time of year. I have been finding that recently I have been tying many of my great memories with friends and family to food. For example, I can't remember a specific christmas by the year, or by how much snow we got, or what my christmas presents were, but jog my memory of what we cooked for 'christmas eve-eve' dinner? Now I remember.

It works the other way too. Lobster crosses my mind? I immediately think about the many July 4th's throughout my childhood when the cousins in my family would draw a track on the driveway with chalk and "race" the lobsters before our parents murdered them (but for good cause) in the giant bubbling stock pot in the kitchen. Granted they usually only moved an inch or so, but it was still fun picking them up and being terrified that they were going to pinch us (even though their claws all had rubber bands on them).

I also think about last winter when some of my favorite people in the world got together at a cabin in northern Wisconsin and had a BYOL party (Bring Your Own Lobster). It unexpectedly took hours to bring the huge stock pots full of water and crab seasoning to boil and didn't end up eating until almost 11 pm, but we kept ourselves busy drinking wine, playing with the very lethargic lobsters, and catching up on lives being lived three states away from each other.

Short ribs and risotto will be one of those meals that is tied to so many great memories for me. It was one of the first 'extravagant' meals I cooked for my boyfriend after we moved to chicago together. It was on the menu last winter when some of my best girlfriends from Purdue finally found a night we could all get together for the first time in months.

It was also the meal I made for eight hungry skiers this past weekend, at what is quickly becoming my favorite tradition: Valentines Day Cabin Weekend. In lieu of the Hallmark world of hearts and candy and forced romantic evenings, my Minnesota friends and I, along with our wonderful significant others, have turned v-day weekend into a weekend full of skiing, laughing, drinking, and eating. Rarely does the v -word even cross our lips, but when it does we aren't just celebrating love in our romantic relationships, we are toasting our friendships as well. The card I received from one of said Minnesota friends sums it up pretty well: "I hope we are still spending valentines day together when we are 80". Until I am 80, when I think of short ribs and risotto, I will be reminded of this very awesome valentines day, the giant red le creuset filled with braised meaty goodness, and the very best friends a girl could ask for.

Cabernet Braised Short Ribs
recipe adapted slightly from epicurious.com
Serves 8 with leftovers

These are great made a day early and chilled overnight. This allows you to to skim some of the hardened fat off the top to produce a less greasy pan sauce, but are just as good made the day of.

8-9 pounds meaty short ribs
2 tablespoons fresh rosemary, minced
2 tablespoons fresk thyme, minced
1 tablespoon coarse salt
1 tablespoon freshly ground black pepper

1/4 cup (about) vegetable or olive oil
2 - 750 ml bottles of Cabernet Sauvingnon
2-4 cups beef stock (this will depend on the size and shape of the pot you use, you will need enough to just about cover the ribs with liquid)
2 tablespoons of butter, room temperature
2 teaspoons all purpose flour

The day before cooking the ribs, season the ribs on all sides with the rosemary, thyme, salt, and pepper and place in a large glass baking dish. Cover and chill overnight.

Let ribs stand at room temp before continuing. Preheat oven to 375 degrees F. In a large dutch oven, heat two tablespoon of oil over medium-high heat. Working in batches, add short ribs to pot in a single layer, turning about every 2 minutes to brown all sides. Place browned ribs in large bowl, and add more oil to pot as needed to brown all the ribs. Once all ribs have been seared, pour off drippings from pot and return to medium heat. Add the wine, scraping up and browned bits on the bottom of the pan. Bring wine to a simmer, then return the ribs and any accumulated juices to the pot. Add enough beef stock to almost cover the ribs. Bring to a boil, then cover and transfer pot to oven.

If making these the day of consumption, cook for about 3-3.5 hours, until meat is incredibly tender and falling off the bone.

If making the day before, cook for about 2.5 hours, then let cool, cover, and chill overnight. The following day, skim some of the congealed fat off the top and return to 375 degree oven for another hour to and hour and a half, until the meat is tender and falling off the bone.

When ribs are done, remove meat and bones from pot, place in a tightly covered bowl and keep warm. Skim any fat from the top of the liquid, and bring to simmer over medium high heat on the stovetop. Boil until reduced to about 2 cups, about 20 minutes. Mix together butter and flour in a bowl until well combined, and whisk into simmering braising liquid. Continue whisking over medium-high heat until thickened slightly, about 2 minutes.

Plate ribs next to, or on top of the risotto, topped with sauce and the mixed herb gremolata.

Meyer Lemon Herb Gremolata
adapted slightly from epicurious.com

Please don't skip this topping. It lends an amazingly bright citrus note to the earthy meatiness of the short ribs.

1/4 cup chopped italian parsley
3 tablespoons finely grated lemon peel, meyer lemon if it is in season
3 garlic cloves, minced
2 tablespoons finely minced rosemary
2 tablespoons finely minced thyme

Mix all ingredients in a small bowl. Can be made one day in advance, but I would recommend making it the day of so the citrus is at its freshest.

Mushroom Risotto
serves 8 plus plenty of leftovers

12-16 cups canned low sodium chicken broth
1 ounce dried porcini mushrooms
1/2 cup unsalted butter, divided (one stick)
4 tablespoons olive oil, divided
5-6 shallots, minced
1 1/2 pounds fresh mushrooms, chopped (I used a mix of white and baby bellas)
3 cups arborio rice
1 1/3 cup white wine
1 1/3 cup grated parmesan cheese
1/3 cup italian parsley, chopped
salt and freshly ground black pepper to taste

Bring the broth to a simmer in a large saucepan or small stockpot. Add the dried porcini mushrooms, reduce heat, and keep the broth warm over very low heat while you cook the risotto. The mushrooms will flavor the broth as they steep.

In a large heavy pot, melt two tablespoons of butter over medium heat. Add two tablespoons of olive oil. Add the shallots and saute until tender, about 6-8 minutes. Add the garlic, and saute for another 2-3 minutes.

Stir in the rice, and let cook until the rice toasts a bit and becomes slightly translucent, about 3-4 minutes. Add the wine and cook until it has absorbed, stirring frequently, about 3 minutes. Reduce heat to medium low, and add 1 cup of hot broth, stirring rice very frequently until broth is absorbed. Continue adding broth 1 cup at a time and stirring, until rice is just al dente. This should take about 30-40 minutes, and you may not need all the broth.

While rice is cooking, remove the porcini mushrooms from broth with slotted spoon, chop, and set aside. Heat two tablespoons of butter and one tablespoon of live oil in a large skillet over medium-high heat. Add fresh mushrooms and porcini mushrooms and saute until mushrooms are slightly browned, 8-10 minutes, stirring occasionally. Cover to keep warm and set aside.

When rice reaches the al dente stage, remove from heat and stir in remaining 1/2 stick of butter, parmesan cheese, mushrooms, and parsley.

Season with salt and pepper to taste.

Add some roasted carrots for good measure and you have yourself a meal.

Make this, and make it often. I can only hope that this wonderful meal may be attached to some amazing memories for you as well.

Wednesday, December 9, 2009

Soup Arsenal


It is good to have a soup arsenal. A list of soups that you can make without consulting the recipe, soups that you are itching to make at the first hint of cold weather, and soups that consistently make you feel warm and full and satisfied. Soups that you like so much that you don't mind eating them for the next three weeks because you made such a huge pot.

This soup is going into my arsenal. I have survived almost three weeks of eating this soup, and as of this afternoon, I am still not sick of it. I fact, I kind of want it for dinner too...

I especially love roasted soups. Put a bunch of stuff onto a sheet pan, throw it in the oven for an hour, buzz it through the food processor and viola: creamy, healthy, thick, complex, soup. Its like magic.

Roasted Butternut Squash, Pear, and Shallot Soup
Adapted from Eatingwell.com

2 pounds peeled, seeded, and cubed butternut squash
2 ripe pears, peeled, cored, and cubed
5-6 shallots, peels and quartered
3 cloves garlic, peeled and crushed
4 carrots peeled and cut into 1 inch pieces
2-3 tablespoons olive oil
4 cups chicken stock
salt and freshly ground pepper, to taste
crumbled goat cheese for garnish

Preheat oven to 400 degrees.

Combine pears, squash, garlic, shallots, carrots, olive oil, salt and pepper, together on a large rimmed baking sheet and toss to coat evenly with the oil. Roast, stirring occasionally, until soft and starting to caramelize, about 50 minutes to 1 hour.

Working in batches, adding vegetables to food processor with enough chicken stock to aid blending. Blend until smooth and pour into large soup pot. Add any remaining stock, stir to combine, and season with salt and pepper to taste.

Serve in bowls with crumbled goat cheese on top.

Get cozy, its going to be a long, cold winter :-)

Pin It

LinkWithin

Related Posts with Thumbnails