Showing posts with label Gum Paste. Show all posts
Sunday, February 22, 2015
Cake-a-palooza Day 1
I am about to make up for some lost time here. Get ready for a cake-a-palooza. 6 days, 6 cakes. Things are about to get real crazy at the bakery, so I figured I better post these pictures now, or they will sit on my hard drive for all eternity. Seven months after starting a new job at a bakery, I find myself once again in a management position. I realized I really missed bossing people around, but more importantly I missed being able to share and implement new ideas to help improve and grow the business. So here we go, let the madness begin once again.
It is almost March and we are quickly approaching wedding season. A few recurring trends you will see throughout the next few days are: metallics applied in new ways, intricate gum paste flower sprays, unexpected pops of color, and the merging of romantic and modern aesthetics.
First up a small but striking cake. The bottom tier is brushed with a metallic copper petal dust and is adorned with gum paste poppies, leaves, and berries in peach and copper hues. The top tier is left blank to showcase the detailed arrangement.
Stay tuned, more to come tomorrow.
*This cake was designed and created by Bria Helgerson, for Sugar Fixe Patisserie.
Labels:
2 Tiered Cake,
berries,
copper,
Fondant,
Gum Paste,
Gumpaste,
Leaves,
metallic,
Poppies,
Wedding Cake
Wednesday, June 25, 2014
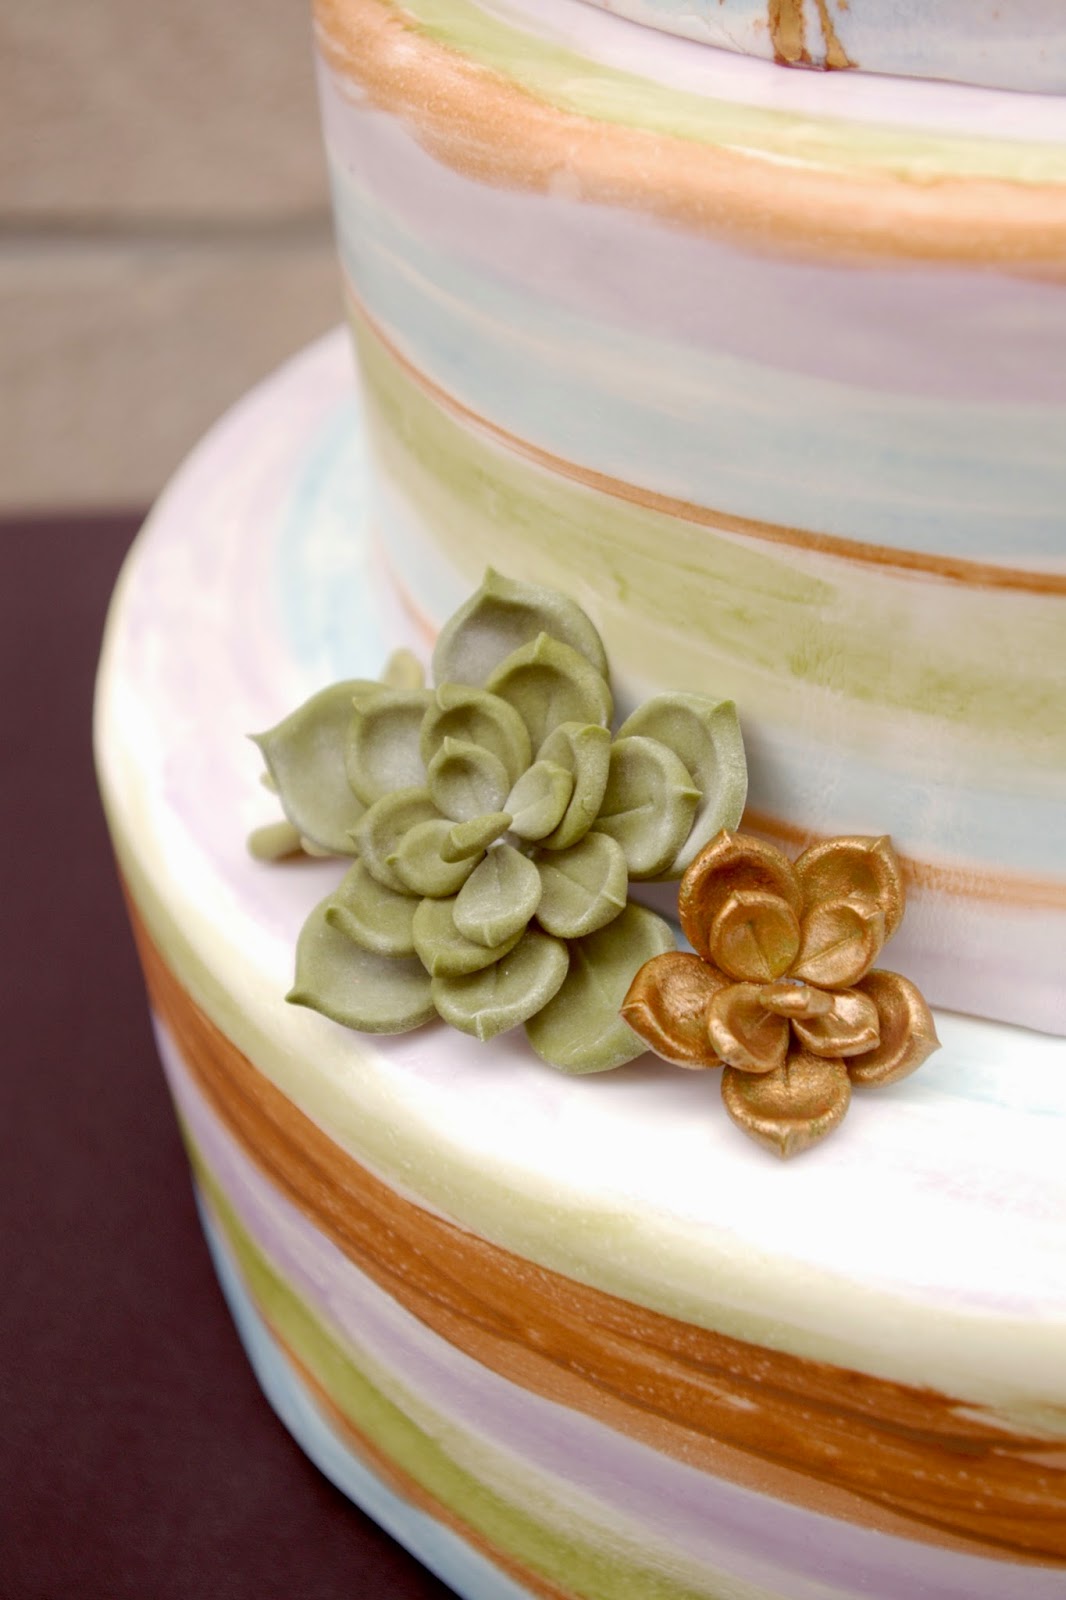
Ranunculus and Succulents...say that ten times fast.
I keep calling it spring. Even though I know it is officially summer, I just cannot seem to get it through my head. Spring has once again flown by without notice, and all of the sudden it is 85 degrees and sunny everyday. Well, almost every day. Usually on my days off from work it rains, so there's that.
Cake season is in full swing, and I have been cranking out wedding cakes at the restaurant like it's my job. Because it is my job, or was my job I suppose. I finished up the last wedding cake I will be doing at the restaurant this past weekend, after some hard decisions were made. I have been pushing and pushing for the last year to keep wedding cakes on the table as an option for our events, because it truly is the favorite part of my job. I learned, however, in this past year that plating desserts and charcuterie boards for service while trying to do watercolor work on a 4 tiered cake or attaching 50 tiny little gum paste petals to a sugar flower, is near impossible. I wasn't achieving the quality of work on my cakes that I know I am capable of, and that is a big disappointment.
So, for now, it's back to regular service at the restaurant, and the wedding cakes will move back into my own personal kitchen for the time being. I have taken for granted how much easier it is to bang out a four tiered cake when you have a large mixer and lots of full size sheet pans. For the next week and a half, it is back to baking at the apartment for a 4th of July wedding in Wisconsin.
These two cakes were by far my favorite from this spring's wedding season. The clients on both of these expressed that they loved my cakes and pretty much let me do whatever I wanted, with a bit of inspiration direction. I was able to push out of my comfort zone a bit, doing gum paste flowers that I hadn't attempted before including the ranunculus, and succulents. I also took my first swing at watercoloring an entire cake. There is something truly terrifying and incredibly awesome about taking a blue soaked paintbrush to a perfectly white, fondant-covered cake 3 hours before the start of a wedding. It wasn't perfect, but I learned a lot in the process and hope that I get a chance to do it again soon.
So, happy summer to all, I for one can't wait to see what this season has in store. Changes, growth, and more new challenges, or perhaps just more rain on my off days. Only time will tell.
Saturday, October 5, 2013
Good as Gold
It's Saturday morning, and I am at home, drinking coffee, and...well, that's it actually. I am sitting in my pj-s, doing nothing. Nothing except writing this post. It feels wonderfully weird. No baking to do, no projects to work on, nothing. I get to spend some time with friends today whom I haven't seen in far too long, participate in some fall-themed activities, and share with you some goodies that I just haven't had the time to post.
A few years ago, I hinted not-so subtly on this very blog that I wanted Santa to bring me an airbrush machine for christmas. Santa pulled through, but unfortunately the machine was swiftly delegated to our second bedroom, otherwise known as the room where kitchen appliances go to die. When a friend of mine asked me to make her a anniversary cake, and showed me the picture of what she had actually wanted her wedding cake to look like (not what they ended up receiving unfortunately). I knew this was a perfect opportunity to resurrect and make use of my not-so new toy.
A smooth layer of buttercream, a quick coat of airbrush gold, and a light pressing of a textured paper towel, gave this cake it's antiqued look. For the flower, I rolled what felt like a million little balls out of fondant in multiple sizes and used royal icing to secure them to the center of the flower. Then I airbrushed the entire center and let it dry before affixing the petals.
Inside is my favorite devils food chocolate cake, frosted with vanilla italian meringue buttercream and filled with this raspberry curd mousse.
Raspberry Curd Mousse
recipe adapted from epicurious.com
12 oz raspberries
1 1/4 cup sugar
2 eggs
2 TBL lemon juice
2 TBL unsalted butter (room temperature)
pinch salt
1 tsp gelatin
1 TBL water
1 cup heavy whipping cream
Combine raspberries, sugar, lemon juice, and butter in a food processor, and pulse until raspberries have broken down. Transfer to a saucepan, and whisk in the eggs and salt. Place pan over medium heat, and bring mixture to 175 degrees F, whisking constantly. Remove from heat, strain through a fine mesh sieve, and let cool to room temperature, whisking every few minutes to aid cooling. Combine water and gelatin and let bloom for 5 minutes. Melt gelatin and whisk into raspberry curd. When mixture has cooled to room temperature, whip the heavy cream to medium peaks. Add the raspberry curd and mix until combined. Chill until you are ready to fill your cake.
You can skip the gelatin if you want, but I found the raspberry curd to be a little runny to be filling layer cakes with. If you are using the curd or mousse for a different purpose you can omit it.
Tuesday, January 17, 2012
CH-CH-CH-Changes
I promise that this will be the only post title this year that references a David Bowie song...
Another January has rolled around, and yet again I find myself in a complete state of change. Pastry school is complete, I officially put in two weeks notice at my serving job, and work at the bakery has exploded (in a good way). In about a week I will be working just ONE job for the first time in a few years, no balancing schedules, no classes, no homework, no job searching, I can finally breath a sigh of relief.
More importantly, I will finally have some free time back in my life. Time to spend with the ones I love, time to spend on myself, and time to spend in the kitchen. MY kitchen. My blog posts no longer will be dictated by what I was making that week in class, or what I was able to snag from the community shelves at school (though I will miss that benefit).
With all the craziness of finals and the holidays, somehow I still found a bit of time to make a few cakes for freelance clients and thought I'd share them with you now.
The first one that you see in the post was actually my final project for pastry school. We basically had free range on our cake, it just had to be 3 tiers. I have lusted after the gray and yellow color scheme for quite a while now, and jumped at the chance to finally use it on a cake.
This next cake was made for a dude. I had never made a cake for a guy before, and his mother who bought it for him asked me to make a 'manly' cake. I have a tendency to put flowers on everything so this was a tricky one. I decided to go with a neutral color theme and try out the plaid trend that I keep seeing everywhere. Overall, I think it was a success, he wasn't embarrassed to be photographed with it at dinner, and enjoyed eating it even more.
Lastly, a very special request. This cake was for a golden birthday (dude cake #2). The birthday boy and his wife apparently have some inside joke about hostess cupcakes, I didn't press for information, but so much so that they served the treats at their wedding. I was asked to make a giant golden hostess cupcake. So that's what I did.
Here's kicking off a new year. New goodies, new topics, new experiences, new routine, new directions. Happy 2012 everyone.
Another January has rolled around, and yet again I find myself in a complete state of change. Pastry school is complete, I officially put in two weeks notice at my serving job, and work at the bakery has exploded (in a good way). In about a week I will be working just ONE job for the first time in a few years, no balancing schedules, no classes, no homework, no job searching, I can finally breath a sigh of relief.
More importantly, I will finally have some free time back in my life. Time to spend with the ones I love, time to spend on myself, and time to spend in the kitchen. MY kitchen. My blog posts no longer will be dictated by what I was making that week in class, or what I was able to snag from the community shelves at school (though I will miss that benefit).
With all the craziness of finals and the holidays, somehow I still found a bit of time to make a few cakes for freelance clients and thought I'd share them with you now.
The first one that you see in the post was actually my final project for pastry school. We basically had free range on our cake, it just had to be 3 tiers. I have lusted after the gray and yellow color scheme for quite a while now, and jumped at the chance to finally use it on a cake.
Lastly, a very special request. This cake was for a golden birthday (dude cake #2). The birthday boy and his wife apparently have some inside joke about hostess cupcakes, I didn't press for information, but so much so that they served the treats at their wedding. I was asked to make a giant golden hostess cupcake. So that's what I did.
Here's kicking off a new year. New goodies, new topics, new experiences, new routine, new directions. Happy 2012 everyone.
Friday, December 9, 2011
Blue Christmas
Its almost as if I willed it to snow last night by making tons of teeny tiny snowflakes out of gumpaste. Is that possible? I wonder what else I could use this power for....
It FINALLY snowed last night. I have been having a little trouble getting into the Christmas spirit with the warm and/or dreary weather this month. The minnesota girl in me craves snow as soon as mid-november hits, and this year has been a huge disappointment so far. Maybe thats why I made a blue cake last night, I think I need to start making big white fluffy cakes with mounds of snow piled on top. It will be like my own personal voo-doo cake, used for good, not evil. Unless you hate snow I guess. Sorry in advance.
I made this cake in my second to last (yay!!) cake decorating class last night, and this morning, instead of bearing down and finishing my final costing project (booooring) I decided to make some matching cupcakes! Lucky for you, I actually took some step by step pictures so you can see how I made the toppers. No, I did not freehand pipe those snowflakes, you think I am THAT crazy? Here is an easy way to get your template transferred onto your fondant to pipe over so you can get a clean, consistent design.
First, roll out your fondant to your desired thickness, I usually go to about 1/16 inch, pretty thin for these.
Cut out your circle, and make sure to dust a good amount of powdered sugar underneath it so it doesn't stick to your work surface. Peel the excess fondant away.
Take your paper template (that you already had cutout, because you are more prepared than I am) and gently press it into the fondant circle.
Use the pads of your fingers to gently rub all of the edges so you get a nice clean imprint. Don't press too hard or you will distort your circle and you run the risk of the paper sticking to the fondant.
Carefully peel away the paper and you are ready to pipe your design.
I used a 00 tip to pipe, I wouldn't go much bigger than a 0 or 1 if you are doing something this small and intricate. Also, I used buttercream to pipe because it's what I had on hand, but you could also use royal icing, you would probably get better line quality that way.
Don't worry if you mess up a little, just let the frosting dry for a few seconds then gently scrape it off with a gumpaste tool or exacto knife.
You can skip this next step if you want, but I think adding a few small sprinkles, strategically placed, makes for a nice finished clean look. Plus the sprinkles hide the ugly corners. Not that you'd have ugly corners, but if you did, this would help.
If your hands are naturally always sweaty like mine, you should just be able to press your finger into each sprinkle and gently press them into the buttercream. You can also use a tweezers if you are a rockstar like that.
Let these dry for a few hours, then gently press them onto your piped frosting.
Voila! Hope you enjoyed this little tutorial, I think this is my first go at one of these. I can say it is trickier than it looks to take pictures with one hand while piping with the other.
Let it snow, let it snow, and here's hoping yours isn't a blue christmas.
Sunday, November 6, 2011
Autumn Cake
At one point this week, I had four fondant cakes of different shapes and sizes sitting in my kitchen. I can't bring myself to throw them away, but I don't know what to do with them. Maybe I will just let them petrify and make a cake shrine in our second bedroom. That probably won't happen, but it's an option. It's hard to dump something in the trash that you spent such a long time on, but nobody wants to eat two-week old cake (not that they will admit anyway). This cake luckily found a home this weekend for a friend's birthday and wasn't sacrificed to the garbage bin.
I am in my last quarter of pastry school, and one of my classes is a cake decorating class that focuses on fondant cakes. Unfortunately, I am not learning as much as I had hoped from this class, so I had to change my way of thinking about it. I now look forward to class as a chance to play and experiment for five hours a week with unlimited materials and lots of fun tools. This week our only restriction was an autumn themed cake, and since I love fall, I was really looking forward to it. I wanted to make a clean and classy fall cake, one that wasn't covered in pumpkins and marzipan fruit, perhaps something that could even be used as a wedding cake. We got to play with the airbrush machine to make more realistic leaves (Santa, if you are listening, Bria has been a very good girl this year and would like an airbrush machine for Christmas).
One great tip I did pick up this week was that I should start hoarding my egg cartons and always be on the lookout for other containers that can be reused to hold gum paste flowers and figures. Drying petals or leaves in a round cup gives them more dimension and movement than if you were to let them dry flat. You can purchase little round cups made specifically for this purpose, but why spend the money when there are things already in your house that work just as well? I happen to shop as Costco, and when honeycrisp apples came out this year, I bought a huge container of them. As I was reaching for the last one this week, I realized that the plastic clam shell they came in was perfect for flower shaping.
A drawback of using bowls that I had around the apartment to hold flower layers was that most of them had a flat bottom, but these apple cups are perfectly spherical. I cannot wait to test them out. Next time you are at the grocery store, check out the produce section, there are all kinds of egg carton-like packaging in different shapes and sizes that may be very useful in your cake creating endeavors.
Hope you enjoyed your extra hour of sleep/play/work this weekend. Happy fall!
Labels:
2 Tiered Cake,
Autumn,
Fall,
Fondant,
Gum Paste,
Leaves,
Special Occasion
Thursday, February 17, 2011
Carrot Cake Cupcakes
My wonderful, smart, talented, beautiful older sister turned 30 today. She is an amazing woman, strong and opinionated, sensitive and compassionate. She can kick my butt running (well doing anything athletic, really) and trivial pursuit, but is still nice enough to share a bottle of wine or a delicious meal with me. I was lucky enough to be able to celebrate her birthday with her, for the first time in years, here in Chicago and I wanted to send her home with one of her favorite treats: carrot cake.
I cannot think of carrot cake without thinking of my sister and our former backyard neighbors the Sonnabends. They have three kids, and the older two and my sister were inseparable growing up. Carrot cake instantly brings to mind a snapshot of Rian and Sara in matching bikinis with their little pot bellies sticking out, hamming it up for the camera, waiting to take on the suped-up slip and slide my dad concocted. Whenever it was time for a Sonnabend birthday, you could pretty much guarantee that a carrot cake would be blazing with candles. For some reason I always despised carrot cake, and thought it was weird that a kid would want a cake made out of vegetables for their birthday, when they could have their choice of anything. Chocolate, vanilla, fun-fetti, angel food, come on, with all the options, carrot cake? Really??
I have since come around and now really enjoy carrot cake, I even snagged a cupcake or two for myself last weekend. Paired with a rich and not too sweet cream cheese frosting, these spiced carrot cake cupcakes made the birthday girl very happy.
Carrot Cake Cupcakes & Cream Cheese Frosting
adapted from Smitten Kitchen
makes two dozen cupcakes
2 cups all purpose flour
2 teaspoons baking soda
1 teaspoon salt
2 teaspoons ground cinnamon
1/2 teaspoon ground nutmeg
1 teaspoon ground ginger
2 cups sugar
1 1/4 cups vegetable oil
4 large eggs, room temperature
3 cups grated carrots, I used a micro plane to grate the very finely, but you can use the small side of a box grater
Preheat oven to 350 degrees F, and line two cupcake tins with paper liners.
In a medium bowl, combine the flour, baking soda, salt, cinnamon, nutmeg, and ginger, and whisk together. In a large bowl, whisk together the oil and sugar until combined. Add the eggs one at a time, whisking to incorporated between each addition. Fold in the carrots, the add the dry ingredients to the wet, and using a wooden spoon, gently mix just until combined, and all dry ingredients are wet.
Spoon into lined muffin tins, until each cup is about 3/4 the way full. Bake for 16-20 minutes on the middle rack, until a toothpick entered into the center of the cakes comes out clean. Let cool in pans for a few minutes, then remove from tins and let cool completely on a baking rack before frosting.
To make the frosting:
16 ounces cream cheese, softened
1/2 cup unsalted butter, room temperature
1 teaspoon vanilla extract
2 1/2 cups confectioners sugar
pinch of salt
Tuesday, February 15, 2011
A Sugar Flower Revelation
I sort of had a revelation this weekend. Nothing earth shattering, more so a bit of self-awareness that I hadn't realized before. At some point during the six hour long gumpaste-flower-making marathon I got to really thinking about how much things have changed over the past year or two, and ultimately how I have changed. My perspective on my work, new projects, and life in general has completely changed from a nervous, second-guessing stance, to a confident, fearless approach. Can I make a tiered, square fondant covered wedding cake, even though I have never done anything like that before? Sure, why not? Should I try my hand at making a flower out of gumpaste for a cake I am delivering tomorrow instead of purchasing a real flower to slap on top? Hell yeah, I think I can do that. No, I know I can do that.
Maybe I have been lucky, and all these projects that I have taken on (maybe some of them a bit foolish) have worked out, and worked out well. But maybe, just maybe, it's this new found confidence I have in myself that is responsible for me being successful all the new things I am trying. Letting go of the fear is paving the way for sturdy cakes, delicate sugar flowers, and new and exciting opportunities in the kitchen. I used to worry so much about completing a project on time, and completing it to my standards, that it would get in the way of my productivity and the quality of the product.
So where did this come from? It came from finally doing something that I feel great about. I got out of a field where I was always second guessing myself, and feeling like my skills weren't up to par. I didn't have the passion for product design that the job really requires, and that in turn affected my confidence with my work. I didn't believe that I could draw a beautiful spatula, for example, and therefore I couldn't, and didn't.In the kitchen, I believe that I can make a beautiful cake. I believe that I can do something, anything, even if I have never done it before. I still have SO much to learn about pastries and cakes and decorating, but I believe that I will take it all in, and will be able to utilize all this knowledge in my new life in the pastry world.
It is really amazing what happens when you sit down to make about 35 layers of gumpaste chrysanthemum petals. I know I have talked before about baking being therapeutic, but I feel that way now more than ever.
Whew, thanks for letting me get that off my chest. Now for what you really came here for: the goods.
This cake and the macarons were made for my sister's very dear friend for her baby shower. She is due in March, and they held a lovely shower for her here in Chicago at the Drake Hotel. I went with some recipes that I know and love, which enabled me to focus on trying something new with the decor. I did a simple and delicious devil's food cake, with cream cheese frosting. The macarons are plain colored shells, some with chocolate ganache, some with lemon curd filling. Some citrus colored ribbons, and a gumpaste chrysanthemum tied it all together, and definitely made me look forward to spring.
You can find the recipes here:
Macarons
Lemon Curd
Devils Food Cake
Cream Cheese Frosting
Subscribe to:
Posts (Atom)