Saturday, February 12, 2011

An Ode to the Croissant, the HOMEMADE Croissant


I have always loved croissants. The buttery, flaky layers, the amazing smell, the way a dollop of jam finds it way into all the little nooks and crannies, just sublime. But little did I know how much better croissants could be when they are homemade, and fresh out of the oven.


Maybe it's the freshness of the ingredients, maybe it's the use of all butter and no shortening, and perhaps its the knowledge that you took the time to fold that dough encased butter into about 1600 layers yourself. Whatever the reason, store bought croissants, or the ones in the can, just cannot compare to homemade.

At some point in the near future, I hope to make these again, with step by step pictures, since that is really the only way to describe and show how to truly make a great croissant. I always wanted to make puff pastry or croissants at home, but was always intimidated by the instructions I read online. I never knew how easy it was until I saw it in person in class this week. While it takes a long time, and may be a little tedious, the best way to learn how it to see the method first hand.


Until I can take some step-by-steps, you can see a pretty good tutorial posted on The Kitchn. The one thing that stands out right away from their pictures is the size of the triangles they cut. If you want a more traditionally shaped croissant, you want to cut a very long and skinny triangle, maybe three inches at the base and 10-12 inches long. Then, cut a one inch slit in the middle of the base, and stretch the corners out a bit until you get a shape like the Eiffel Tower. You will get even more layers and rolls this way.

This February, the bleakest month of the year, try something you have been afraid to make. Pie crust, souffle, lemon curd, short ribs, duck, deep fried goodies, what's on your list?

Monday, February 7, 2011

Thunder Snow

It's the snowpocolypse here in Chicago! We got over 18 inches of snow last week, the third highest snowfall in Chicago on record. How did the people of Chicago deal with this? By freaking out, storming the grocery stores and clearing the shelves of meat, bread, and bottled water. Come on people, you live in Second City, put on your big-girl snow pants and walk the two blocks to the grocery store if you need more food.


Luckily I was prepared for the lack of groceries in the store, with a freezer full of homemade bread. I was hoping to pick up some steak and make some beef bourguignon before the blizzard hit, but all the crazies got to the meat case first. So I subsisted on bread and cheese and salami (tough right?).

This prosciutto bread ranks up there with some of the best bread I have ever had. I mean, a little lard, a lot of prosciutto, crispy crust, chewy moist insides? It doesn't get much better than that people. I cheated a little because I was able to use the big stone ovens with automatic steam in my pastry school kitchens, which resulted in an amazing crust, and a beautiful hard cornmeal-dusted bottom. But, if you are handy you can get close to the same effect at home with a pizza stone and a spray bottle of water.


Prosciutto Bread
from Professional Baking by Wayne Gisslen

Yeast Starter:
15 oz Bread Flour
9 oz water
.03 oz fresh yeast (this is just a pinch of yeast, barely measurable)

Dough:
9 oz water
.33 oz (1/3 oz) fresh yeast
1 lb bread flour
.33 oz salt
1 oz lard, softened
3.25 oz yeast starter
5 oz. Prosciutto, diced into very small pieces
cornmeal for dusting

In a small-medium stainless steel bowl, combine the .03 oz of yeast and the 9 oz. of water and mix gently to combine. Add the 15 oz. of bread flour, and mix to combine, using your hands to gently knead in the bowl a few turns until it comes together. Dough will be dry and shaggy, but that is ok. Cover bowl tightly with plastic wrap and let sit at room temperature for 18 hours, or if you find a nice warm 80 degree spot, you can reduce that to 12 hours.

Once your starter is ready you can finish making the dough. In a large bowl, combine the .33 oz. fresh yeast with the 9 oz. water and mix to break up the yeast a bit. Add a bit of the bread flour and mix with a wooden spoon until you get a wet slurry consistency. You can now add the salt and fat. Mix to combine, if you have chunks of lard, it is okay, they will get kneaded in. Measure our just 3.25 ounces of your starter and break it up into smaller pieces and then add to your slurry. Begin adding flour a little at a time, until the dough comes together enough for you to handle it with your hands.

Turn dough out onto a floured surface, and begin kneading, adding flour as needed. You may not use all 9 ounces of your flour, but you will want to keep kneading and add flour until the dough is no longer tacky. Knead for about 8-10 minutes, until you can gently poke the ball of dough and it springs back almost completely. Gently knead in the diced prosciutto until evenly dispersed. Gather dough into a ball and cover with plastic wrap. Let dough rise for 1 hour at 80 degrees, or if your kitchen is cooler, until it has doubled in size.

Turn out dough onto a lightly floured surface, and gently press all the air out of your dough. At this point it is time to portion and scale your dough, but I chose to make this into one large loaf, which made it great for sandwiches. If you would like to make two smaller loaves, weigh your entire dough, then portion it into two equal pieces. Gather your dough into a ball, pulling the bottom into itself to create a stretched skin on the outside of your dough. Let the ball of dough rest on your counter under a bowl or a damp kitchen towel for 20-30 minutes. This will let the gluten relax and make it easier to shape.

You can either leave it in a round shape, or gently roll the edges to create more of a football shape, called a battard. Sprinkle a generous amount of cornmeal on a parchment lined baking sheet (or on a pizza peel or an upside down baking sheet if you are using a pizza stone) and let proof at 80 degrees for 1 hour, or slightly longer at a cooler temperature.

Meanwhile preheat your oven to 425 degrees F, and if using, preheat your pizza stone. When your bread is proofed, take a sharp knife and make three long slashes diagonally across the top of your loaf, about 1/4 - 1/2 inch deep. Bake until loaf is golden brown, and has reached an internal temperature of  around 200 degrees F, about 40-45 minutes. Every 5 minutes for the first 20-25 minutes of baking, quickly open the oven door and generously spray the oven around the bread with cold water. When bread is done cooking, it should feel light for its size, and sound hollow when thumped with your fist.

This is important...make sure you cool your bread on a baking rack completely. This allows air to circulate all the way around the bread and prevents your bread from getting soggy. Store in a paper bag at room temp for up to 24 hours. If you are not not using it right away, slice and freeze wrapped first in plastic, then in aluminum foil.

Saturday, January 29, 2011

Tough Decisions & Tender Biscuits


I have been sitting in front of a blank post form for about 30 minutes now. I think I have started a first sentence at least ten times and promptly deleted the boring, meaningless words. Maybe it's the day-quil giving me serious writing block or, it could be all the butter I have consumed in the last few days.

The writers block and lack of posting in the past few weeks is more likely due to the slightly drastic changes my life has taken in 2011. It is almost February and all of the sudden I find myself once again with one job. I officially quit my design job (you know the one that I was laid off from, and was rehired to, all in the past 15 months) after a lot of pushing for some commitment and security, which turns out was all in vain. Hard decisions had to be made. What was best for my soul, my sanity, and my career? Was it better to take a part time job in a environment that wasn't healthy but where I was using my degree, or is it better to keep my job as a food server where my managers care about my well being and my sense of job security?


This dilemma was something I had been struggling with for about 3-4 months, but the issue was pushed front and center when I decided to enroll in a baking and pastry certificate program here in Chicago. This is something I have wanted to do for a long long time, and I finally decided to take the plunge and go for it. I am three weeks in, and besides a long and boring weekend sanitation class, it is everything I hoped it would be and more. We have made scones and biscuits, focaccia, challah, french baguettes, and other goodies. I have learned so much in the little time I have been in school and can hardly wait for what the rest of the year will bring.

I have come to feel really good about the tough choice I felt I had to make, and cannot wait to be able to put all my positive energy into school and the many baking jobs I have lined up for the spring. So, let's kick off what will probably be a long string of baked goods here on the blog with some delicious buttermilk biscuits. I have never made biscuits before, and for some reason had gotten it in my head that they were a difficult thing to make. I don't know what I was thinking, they are incredibly easy, and so fast. Most importantly though, they are buttery and flaky and taste amazing.


Buttermilk Biscuits
adapted from Professional Baking by Wayne Gisslen


2 lbs. 8 oz. all purpose flour (if you have them available, use half bread flour and half pastry flour for better results, but for the everyday home cook, AP still produces an excellent biscuit)
.75 oz. salt
2 ounces sugar
1.5 oz baking powder
.4 oz baking soda
14 oz. unsalted butter, cold and cubed into 1/2 inch pieces (plus some extra melted for brushing)
1 lb 10 oz buttermilk

Preheat oven to 400 degrees F.

In a large bowl, whisk together the flour, salt, sugar, baking powder, and baking soda. Sprinkle the cold butter over the dry mixture and with your fingers, break up the butter into smaller pieces to evenly distribute throughout flour (you can also use a pastry cutter, but using your fingers is way more fun). For flakier biscuits, do this until you have chickpea sized pieces, in other words, leave fairly big chunks of butter in your mixture. Just walk away, stop touching the butter (I know it's hard). For more mealy textured biscuits, you can break up the butter until it is in very teeny pieces, but I recommend the layered flaky goodness.


Add the buttermilk to your flour and butter mixture and mix with a spoon until dough starts to come together, then get in their with your hands and form the dough into a rough ball. Turn out onto a clean, lightly floured surface, and knead just a few times until you form a cohesive dough.

Gently press into a rectangular shape, and roll out with a rolling pin until about 3/4 inch thick, being sure to keep your surface underneath the dough floured to prevent sticking. Cut into 12-16 rectangles, depending on how big you would like your biscuits, and place on a parchment or silicone lined baking sheet. You can either keep them together in a tight rectangle for soft interior sides, or spread them out for a evenly baked, crispier biscuit. Brush tops lightly with a bit of melted butter. Bake for 15-20 minutes, until biscuits are golden brown and have puffed up.

Thursday, January 13, 2011

Curried Squash & Wild Rice Soup


The weekend has once again come and gone, and yet again I am left with thoughts unfinished and tasks undone. My to do list has grown exponentially, and it seems that I am playing an endless game of catch up. Sunday marked the first day in weeks that my alarm clock was quiet until after the sun came up.

I suppose I could have caught up on the sleep lost over the past few weeks to racing thoughts and hard decisions, instead, I rolled myself out of bed and pulled out my Le Crueset. I flicked the burner on, and in went the turkey carcass that has been waiting in my freezer since thanksgiving, some carrots, onions, herbs, and garlic. Soon, the wonderful scent of homemade stock was filling the apartment. All I had to do was wait, so I pulled out another stock pot, and went to work peeling squash, sweet potatoes, and apples.

Soon enough, my stove was full of soups bubbling away, and my mind was perfectly clear. I was no longer worrying about the big changes about to come, or the new directions my life may be taking. I wasn't thinking about jobs and money and bills and credit cards. All I had to think about was not burning the chicken and apple sausage or over cooking the wild rice that were destined to join the roasted squash in the soup pot. I was filled with the anticipation of a new recipe working out with no kinks, and most of all filling my tummy with a wonderfully hearty and comforting soup.


This soup is chocked full of good stuff. Butternut squash, sweet potatoes, apples, and shallots, get roasted together and pureed. Then nutty wild rice is added, and topped with some chicken apple sausage. Lets not forget the warming kick from a little curry powder that really balances out the sweetness from the apple and squash. I have a few soups I tend to make over and over again, so this time I was looking for a little familiarity, but also something new.

I kept thinking about a butternut and wild rice soup from Emril Lagasse, recommended to me by my sister, but when I went to look up the recipe, it had a ton of heavy cream, and just didn't appeal to my mood at the time. So I took the notion of combining squash, sausage, and wild rice and made it my own. This was a great adaptation of a simple roasted vegetable soup, I hope you all get the chance to try it soon.


Curried Squash and Wild Rice Soup
this makes a HUGE pot of soup, feel free to halve

1 - 4 lb butternut squash, peeled, seeded, and cubed into 1 inch pieces
2 large sweet potatoes, peeled and cubed into 1/2 inch pieces
6 shallots, peeled and quartered
2 small granny smith apples, or 1 large, peeled, cored, and quartered
10-12 cups chicken stock
1 1/2 cups wild rice, cooked according to package directions
1-2 tablespoons curry powder
4 chicken-apple sausages (feel free to substitute any sort of sausage here) quartered lengthwise and diced
olive oil
salt and pepper

Preheat oven to 400 degrees F.

Toss squash, apples, shallots, and sweet potatoes with a few tablespoons olive oil, season generously with salt and pepper, and spread in an ever layer on two baking sheets. Roast for about an hour, tossing a few times, until soft and cooked through, and beginning to turn golden brown.

Transfer about 1/2 the vegetables to a food processor with 2-4 cups of chicken stock (enough to cover veggies), and puree until smooth. Transfer to stock pot, and repeat with remaining vegetables.  Stir in the cooked wild rice, and add the remaining chicken stock to desired thickness. Season with 1-2 tablespoons of curry powder, depending on how spicy you like it, and salt and pepper to taste. Bring the soup up to a very gentle simmer.

Meanwhile, heat a small amount of olive oil in a medium saute pan, and cook the sausage over medium high heat until cooked though and crispy brown on the outside. You can either stir the sausage in, I prefer to use it more as a garnish.


This soup freezes very well, so feel free to make a huge batch, it will be enough to get you through the remaining months of winter.

Monday, January 3, 2011

A Nearly Perfect Christmas Eve Eve Dinner

For years, my immediate family has had a tradition of making an extravagant meal the night before Christmas Eve, also known as 'Christmas Eve Eve'. It's like a kickoff to the main event, though in recent years it has become my favorite part of the entire holiday. We have made blinis and beef cheeks, lamb shanks and crab cakes, gougeres, tarts, truffles, and about anything else you can think of. We have opened numerous bottles of Brunello and Porto and Champagne, and spent many many hours and days prepping and cooking and baking.


While every year has been memorable, this year topped them all. And it wasn't just the food that made this year outshine them all. Yes the revamped-retro inspired menu was incredibly aggressive, and we pulled it off swimmingly, savoring each and every bite, but it was the company, and the laughter, that will stay with me the most when I reflect back on this Christmas. We cooked and baked for two days, all four of us squeezed into the kitchen for one of them. There was laughing and heckling (in the most loving sense possible), lessons being taught, and skills being eagerly learned. Stories of our lives spent apart over the past month were told, encouragement and understanding were shared. Wine flowed freely into skillets and stomachs, and the food that we worked so hard on, was eaten around a beautifuly decorated table. Most importantly though, the meal that night was eaten together, the four of us, celebrating our health and happiness.

Okay that was pretty mushy, I may or may not be suffering post-Christmas home-sickness and cookie withdrawal. Onto the good stuff (the menu of course!). It all started with the idea to recreate a dish that my family had at a new restaurant in Minneapolis, who had the audacity to serve tater tot hot dish.  Now, this was not the tater tot hot dish of my youth. You know, the one with ground beef, a can of cream of mushroom soup, canned green beans, all covering a crispy layer of frozen tater tots. Nope this was tater tot hotdish, brought into the 21st century and put on steroids. We knew we had to make this at home, but what to serve with it? The menu quickly formed by thinking of slightly kitschy, old-school, retro food, that we could revamp and put a gourmet spin onto.

First up, pigs in blankets. Actually by the end of the appetizer course these became known as 'chicks in snuggies'. I blame the Champagne. Homemade sous-vide-d chicken sausages, were sauteed and wrapped up in buttery puff pastry. We baked them up and dipped them in a horseradish-sour cream sauce, and an oatmeal stout-mustard-shallot sauce. These exceeded all expectations. We knew they were going to be good. How good though? We were blown away.


Next up, soup and salad. We took the classic wedge salad and threw it on the grill along with some cherry tomatoes. We had homemade blue cheese dressing prepared by my smarter, prettier, older sister. Here's where the fun with the deep fryer came. Pops sous-vide-d some pork belly, breaded it, and deep fried it. It was crispy, fatty, pork heaven I tell you. Pork Heaven. Amen.


We added some roasted pureed cauliflower soup for good measure, you know, cause we didn't have enough to eat already.


Now, this may not be the prettiest dish you've ever seen on camera (plus, it was dark, and I really just wanted to dig in), but trust me, you can not go wrong with oatmeal stout braised short ribs, porcini mushroom béchamel sauce, deep fried potato croquettes, and steamed buttered french green beans. This may be the peak of the proverbial comfort food mountain. I dream about this dish.


The crowning moment, the cake.


Actually this was a disappointing moment, and the reason for the title of this post being a nearly perfect dinner. This recipe came from the cover of last month's Bon Appétit Magazine. The problem was that the cake just wasn't very good. I am not sure if I did something wrong, which is entirely possible, but the actual cake was dry and crumbly. If I ever made this again, which I may, it was stunning, and the frosting was insanely good, I would stick with the chocolate devils food cake I have made many times now. Poor thing sat on the table for three days after Christmas since no one could bring themselves to toss it.

Thankfully, there was cheese.  It just wouldn't be Christmas eve eve dinner without a cheese plate and a vintage Porto. And Trivial Pursuit.


Someday, my sister and I will beat my parents....someday. Until then, we will just have to keep practicing making amazing meals, and spending much needed quality time together as a family.

Friday, December 24, 2010

Lost it?

I think I have gone and lost it. Lost my kitchen mojo that is. Usually this time of year I am constantly in the kitchen, baking cookies and stews, braising meat and making stock. This year? All I seem to be doing in the kitchen is screwing things up. Burned caramel, melted cookies, disastrous deep frying incident...it's really been bringing me down. Things have been so hectic around here, it seems that when I finally get a chance to get my butt behind the stove, I am more rushed than usual and when that happens I have a tendency to let things get out of control (see the disintegrating falafel incident).


One thing that DIDN'T get screwed up royally was our Middle Eastern/Mediterranean Christmas feast. Well, the majority turned out wonderfully anyway. I need a new falafel recipe, as the one I used completely burst into a million little pieces once dropped into the deep fryer. Luckily, we still had plenty of hummus, pitas, and beef and chicken shawarma to fill our bellies that night.


I don't know how authentic these recipes are, but the spices in both the chicken and the beef meatballs, tasted just like the shawarma you would get from your local middle eastern take-out place. Shawarma is typically roasted on a spit over hot fire and sliced off in thin layers, similar to a kebab, but since I have neither a large spit, nor a large fire, I opted for my broiler and a charcoal grill. Topped with some very pungent tahini sauce and stuffed into a soft, thick pita, they hit the spot.

Chicken Shawarma
adapted from about.com
makes about 4-6 sandwiches

1 1/2 pounds boneless chicken breast tenders
1 cup plain Greek yogurt
1/4 cup white distilled vinegar
3 garlic cloves, minced finely
1 teaspoon fresh ground black pepper
1/2 teaspoon salt
1/4 teaspoon ground cardamom
1 teaspoon ground allspice
juice of 1 lemon

Combine all ingredients minus chicken in a large ziploc bag and mix until combined. Add chicken, coat evenly, and let marinate in the refrigerator overnight, or at least 8 hours.

Prepare grill. I grilled these on a charcoal grill over direct heat, moving the chicken to indirect heat when they were nice and seared. The chicken I used was pretty thin, so it took about 10-15 minutes total cooking time. Just be sure to bring the internal temperature up to 165. You can also cook these on a grill pan indoors if you have a good vent hood, as the marinade is going to create some serious smoke.

Serve warm or at room temperature in pitas with hummus or tahini sauce. If you are one of those crazy people who actually likes cucumbers, I hear some slices are particularly good on this sandwich.

Beef Shawarma Meatballs
adapted from Evil Shenanigans
makes about 20-24 meatballs

1 pound ground beef (I used 80/20, but you can go a little leaner if you want)
3 garlic cloves, minced finely
1/2 teaspoon fresh ground pepper
1/2 teaspoon salt
1/2 teaspoon ground allspice
1/2 teaspoon ground cardamom
1/4 teaspoon ground cinnamon
1/4 teaspoon ground coriander
1 tablespoon lemon juice
1/2 onion, diced finely
2 tablespoons plain Greek yogurt

Line a baking sheet with tin foil and spray lightly with non-stick cooking spray.

In a large bowl, mix all ingredients until well combined. Gather about two tablespoons, roll into a ball, place on prepared baking sheet. Repeat with remaining beef mixture. You should get about 20-24 meatballs. Let rest at room temperature for 30 minutes.

Preheat your broiler, bake for 15-20 minutes, until the internal temperature reaches 155. Cover with foil and let rest for 10 minutes before serving.

Tahini Sauce

1 cup tahini
1/4 cup Greek yogurt
3 cloves garlic, minced very finely
1/4 cup lemon juice
1 teaspoon ground cumin

Mix all ingredients together in a medium bowl. Let stand at room temperature until serving.

Tuesday, December 7, 2010

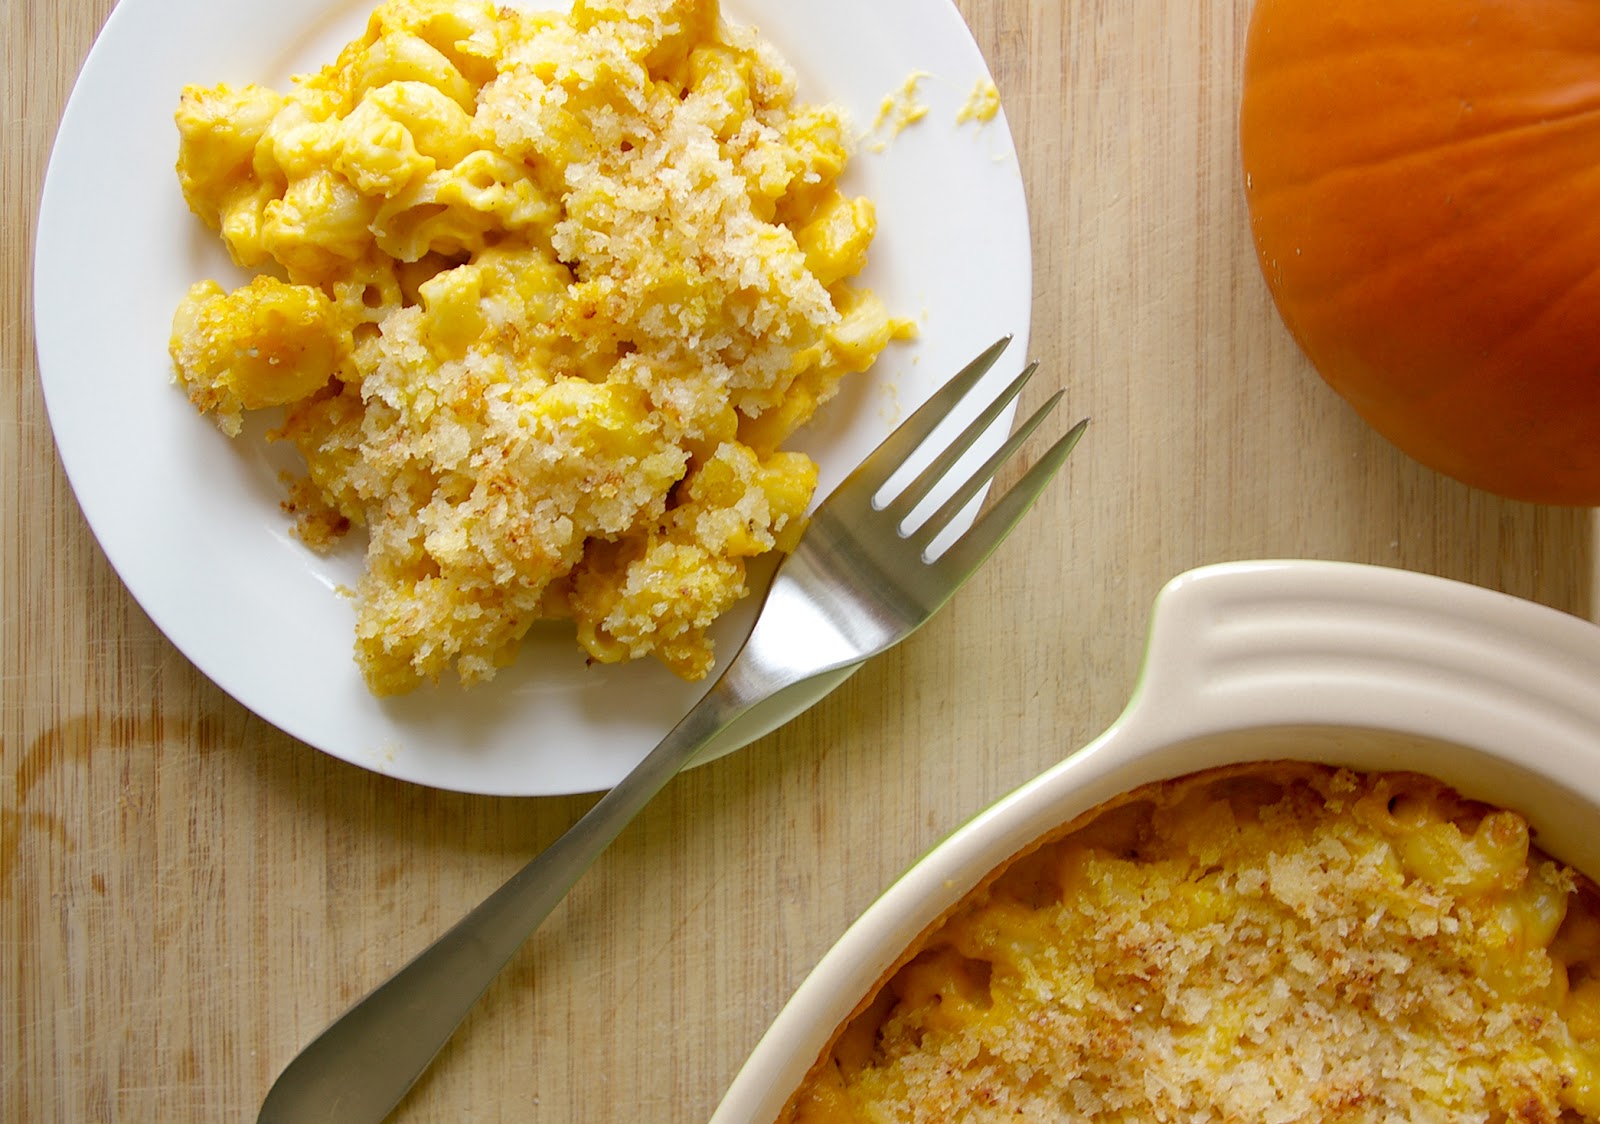
Pumpkin Mac


Thanksgiving is long gone, the Christmas decorations are up, the ground is covered in snow....and yet I am still finding random cans of pumpkin around my apartment. I am not kidding, they are everywhere. I think that as a result from the big pumpkin-shortage scare of 2009, I over compensated with my pumpkin purchasing this fall. Every time I went to the grocery store in late October and early November, I picked up a can, you know, just in case they ran out before Thanksgiving. I wonder if I am beginning to exhibit hoarding tendencies.


Luckily, after all the pumpkin pies and tarts were made, I found an even better way to use up my seemingly endless supply of extra pumpkin. Pumpkin macaroni and cheese. I have been seeing versions of this creation all over the blog-o-sphere lately, and I am so glad I tried it. It wasn't overwhelmingly pumpkin-y, but very rich and creamy with a hint of squash flavor at the end. I added some Gorgonzola and ground mustard to the mix, just to give a little extra bite to cut through the rich cheesy pumpkin sauce.


Pumpkin Macaroni and Cheese
serves 8-10

1 pound dried pasta (I prefer cavatappi or penne rigate, it holds the sauce really well)
1 quart whole milk
1 stick butter, divided
1/2 cup flour
1 15 ounce can pure pumpkin puree (DO NOT use pumpkin pie filling, not the same thing!)
8 ounces Gruyere cheese, grated
8 ounces cheddar cheese, grated
4 ounces crumbled Gorgonzola cheese
1 teaspoon ground mustard powder
1/2 teaspoon ground nutmeg
1/2 teaspoon freshly ground black pepper
1 tablespoon salt
1 1/2 cups panko bread crumbs
1/2 cup pecorino romano cheese, grated

Bring a large pot of salted water to a boil, and cooked the pasta until just al dente. It should still have some bite to it as it will continue to cook while baking. Drain, set aside.

Preheat oven to 375 degrees F. Meanwhile, heat the milk in a small saucepan over low heat, being careful not to let it boil or burn.

Melt 6 tablespoons of the butter in a large, heavy bottomed pot over medium-low heat. Add the flour and whisk constantly until combined and just starting to turn a light brown color, about 2-3 minutes. Slowly add in the milk, whisking until smooth and thick, about 3-5 minutes. Remove from heat and stir in the Gruyere, cheddar, and Gorgonzola cheeses, pumpkin puree, salt, pepper, nutmeg, and ground mustard.

Add the pasta and stir until pasta is evenly coated. Pour into a 10 x 14 baking dish, or alternatively you can use two slightly smaller ones. (I do this, and freeze one of the pans after baking, that way I am only tempted to eat half a pound of pasta in one sitting, rather than the entire pound.)

Melt the remaining two tablespoons of butter in the microwave, then mix with the panko and pecorino romano. Sprinkle the bread crumb mixture all over the top of the pasta and bake for 30-40 minutes, until top is golden brown and bubbly.

If anyone has any other more savory ways to use up excess pumpkin, please let me know in the comments, I think I still have a few cans lying around...

Pin It

LinkWithin

Related Posts with Thumbnails